Prompts, documents and skills
Feed Fil's AI image, video and code nodes with prompts, Markdown briefs, PDFs and SKILL.md skills, and edit them full screen like a Notion page.
Words steer every run on a canvas. A Prompt says what to make. A Document (a Markdown brief, notes, a PDF or a web page) gives the nodes it feeds background to read. A Skill is a SKILL.md: instructions a node follows each time it runs. Wire any of them into an Image, Video, 3D, Code or Audio node and they go into its next run.
Feed a brief and a skill into a node
This walk-through uses a canvas with a Markdown brief and a SKILL.md on it. To bring your own in, drop the files on the canvas (see Add a document).
- Add a Prompt and an Image node, and drag the Prompt's + onto the Image node (see Connect nodes).
- Click the Prompt's first chip and choose Image from the Generate as menu. A new Prompt is on Auto, and its button reads Plan; on Image it reads Generate.
- Drag from the + at the brief's right edge onto the Image node. The canvas says "Connected Brief.md to Hero shot", and the row of inputs under the node's header counts it: "1 doc".
- Click in the Prompt and type
/. A menu opens under it with Skills (the skills on this canvas, then any in your library) and Templates. Keep typing to narrow it. - Press Enter, or click the skill. It's wired into the Prompt, and its name goes into the text as "/tea-photography". Whatever the Prompt feeds gets the skill too.
- Write the rest of the prompt: what this picture is.
- Click Generate on the Prompt. It runs the Image node it feeds; the price is on the button (7 credits for Nano Banana 2.1 at 2K).
- The Image node shows Generating with a timer while it works, then the picture lands in it, with what the run cost under it.
The Image node's inputs row lists what goes in, above its own prompt field: "2 docs" and the Prompt's text. Click a link between two nodes to see what flows along it in the panel, for example "The document text is added as reference notes for Hero shot".
How documents and skills reach the model
| Wired in | What the run gets |
|---|---|
| Prompt | Its words, as part of the prompt |
| Document | Read by Claude before the run; what matters goes into the prompt |
| Skill | Its instructions, read the same way |
| The text of its first 30 pages | |
| Web page | Its readable text, without menus, headers and footers |
Before a picture, clip, 3D model or sound runs, Claude reads the documents and skills wired in (up to 24,000 characters in all) and writes what the run needs from them into the prompt, so the model gets one clear prompt. Code nodes (pages, slides, articles and skills) read briefs and skills whole, beside the prompt, up to 60,000 characters. A document wired into a Prompt goes into whatever that Prompt makes.
Write a prompt
- Add one: double-click empty canvas, click Prompt on the toolbar (or press T or 1 outside a text field), or right-click and choose Add prompt. Plain text you paste onto the canvas becomes a Prompt too.
- Length: you can type up to 2,000 characters. Pasted text up to 4,000 characters stays a Prompt; longer text becomes a text document instead.
- What it makes: the first chip at its foot opens the Generate as menu: Auto ("Claude Sonnet 5.5 plans the nodes"), then Image, Video, 3D, Code and Audio, each with the model it starts on.
- Run it: on a kind, the button reads Generate and runs the idle node of that kind it feeds, or adds one wired to it. On Auto, the default, it reads Plan. Enter in the field starts a new line; with the node selected and not typing, Enter runs it.
- Files: type
@for the files this node can use, on this canvas and in your library. Picking one wires it in.
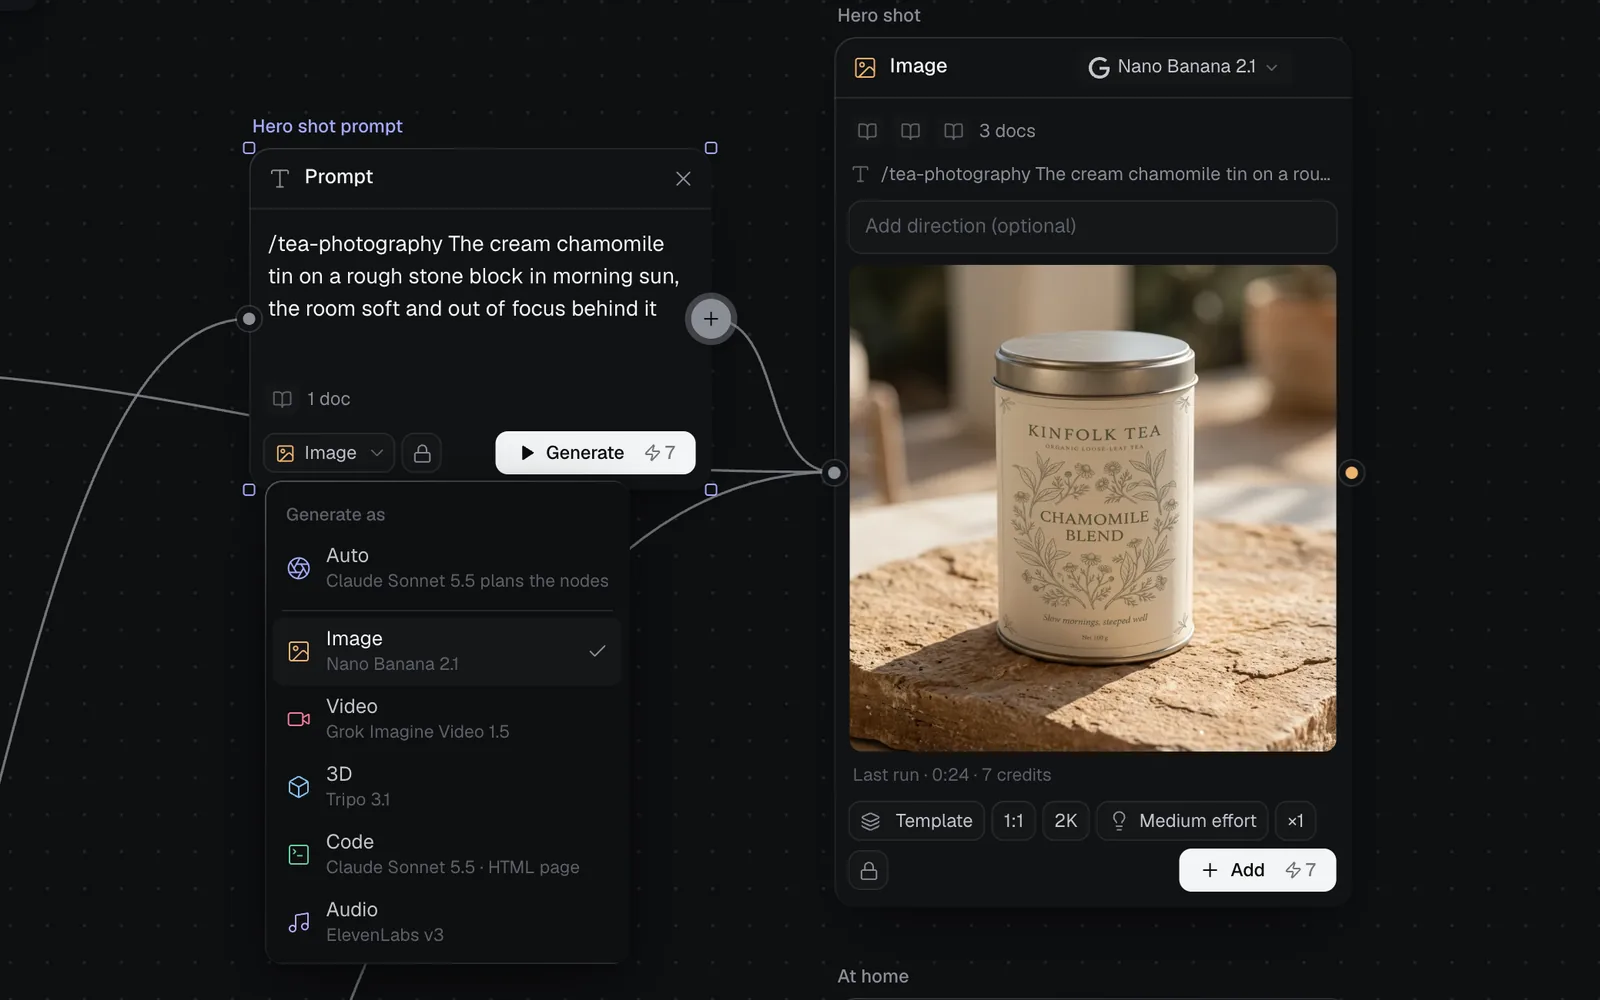
Select a Prompt to see it in the panel: its word and character count, the Generate choices, References (files wired into it), Feeds (the nodes it goes into) and a Note.
Plan nodes from a prompt (Auto)
On Auto, Claude plans the nodes a prompt becomes, and you choose before anything runs.
- Write what you want, for example "Three Instagram posts for the chamomile launch", and leave the Prompt on Auto.
- Click Plan. The button reads Planning while Claude Sonnet 5.5 reads the prompt and knows what's wired into it (how many pictures, clips and documents).
- A card asks "Which should I make?" with up to three options, each with its nodes and price (with a single option it asks "Make …?"). The first is the one Claude recommends.
- Untick nodes you don't want. Each node's model and aspect ratio chips can be changed here.
- Click Add nodes to put them on the canvas without running them, or Generate 3 (the number follows what's ticked) to run them, at the price on the button.
Planning is free; only the runs you start cost credits. Planned nodes say "Planned from" and the prompt they came from. Plans in the canvas chat work the same way: see Chat and plans.
Add a document: Markdown, text, PDF or a web page
Documents come from files and from what you paste. To start a brief from scratch, paste a heading such as # Brief onto the canvas: it becomes a Markdown document named Brief.md, ready to open full screen and write in.
- Drop files on the canvas.
- Click the upload button on the toolbar (⌘U) or right-click and choose Upload files.
- Paste: Markdown or formatted text (from Notion, Google Docs or Granola) becomes a Markdown document named after its first heading. A web address brings in what it points to: a picture, a PDF, or a document showing the page.
| You add | You get |
|---|---|
| A .md file | A Markdown document, with Preview and Code tabs |
| .txt, .csv, .json, .yaml… | A text document |
| A PDF | Its first page; every page full screen |
| An HTML file | The page itself, which a Code node can revise |
| A web address | The site, live where it allows it |
A document's header reads Document, with its file type beside it (MD, TXT, PDF, CSV, JSON, WEB…); a skill's reads Skill. Its foot gives its size and word count. When you drop a JSON or CSV file that reads as data, the canvas offers Use as site data, for a website's content (see Dynamic websites with data).
A document keeps up to 9,000 bytes of text, about 9,000 characters of plain English or roughly 1,500 words. Anything past that is cut when it's added, and a counter appears as you get near the limit while you edit. Markdown documents and skills stop at 400 px tall on the canvas and scroll inside; a plain-text document shows its opening lines, and all of it full screen. More on uploads and file sizes: Files and the library.
Edit a document full screen
Markdown and text documents open in an editor like Notion's or Craft's, with an inspector beside them.
- Point at the document and click the button at its top right corner (Edit full screen), or double-click its text. It opens on Edit, with the caret where you clicked.
- Type. Markdown at the start of a line becomes a block as you type:
#a title,##a heading,-a list,1.a numbered list,>a quote. - On an empty line, type
/for the Blocks menu: Text, Title, Heading, Subheading, Bulleted list, Numbered list, Quote, Code and Divider. Keep typing to narrow it, and press Enter to pick. - Select words for the toolbar above them: first the block's style (for example Text), which turns the block into another kind, then Bold ⌘B, Italic ⌘I, Strikethrough ⌘⇧X, Code ⌘E and Link ⌘K.
- Press Esc to save and see how it reads (View). Esc again goes back to the canvas, where the node shows the new text.
Point at a block for its handles: + adds a block below, and the grip opens Turn into, Duplicate, Move up, Move down and Delete. ⌘Z undoes any of it.
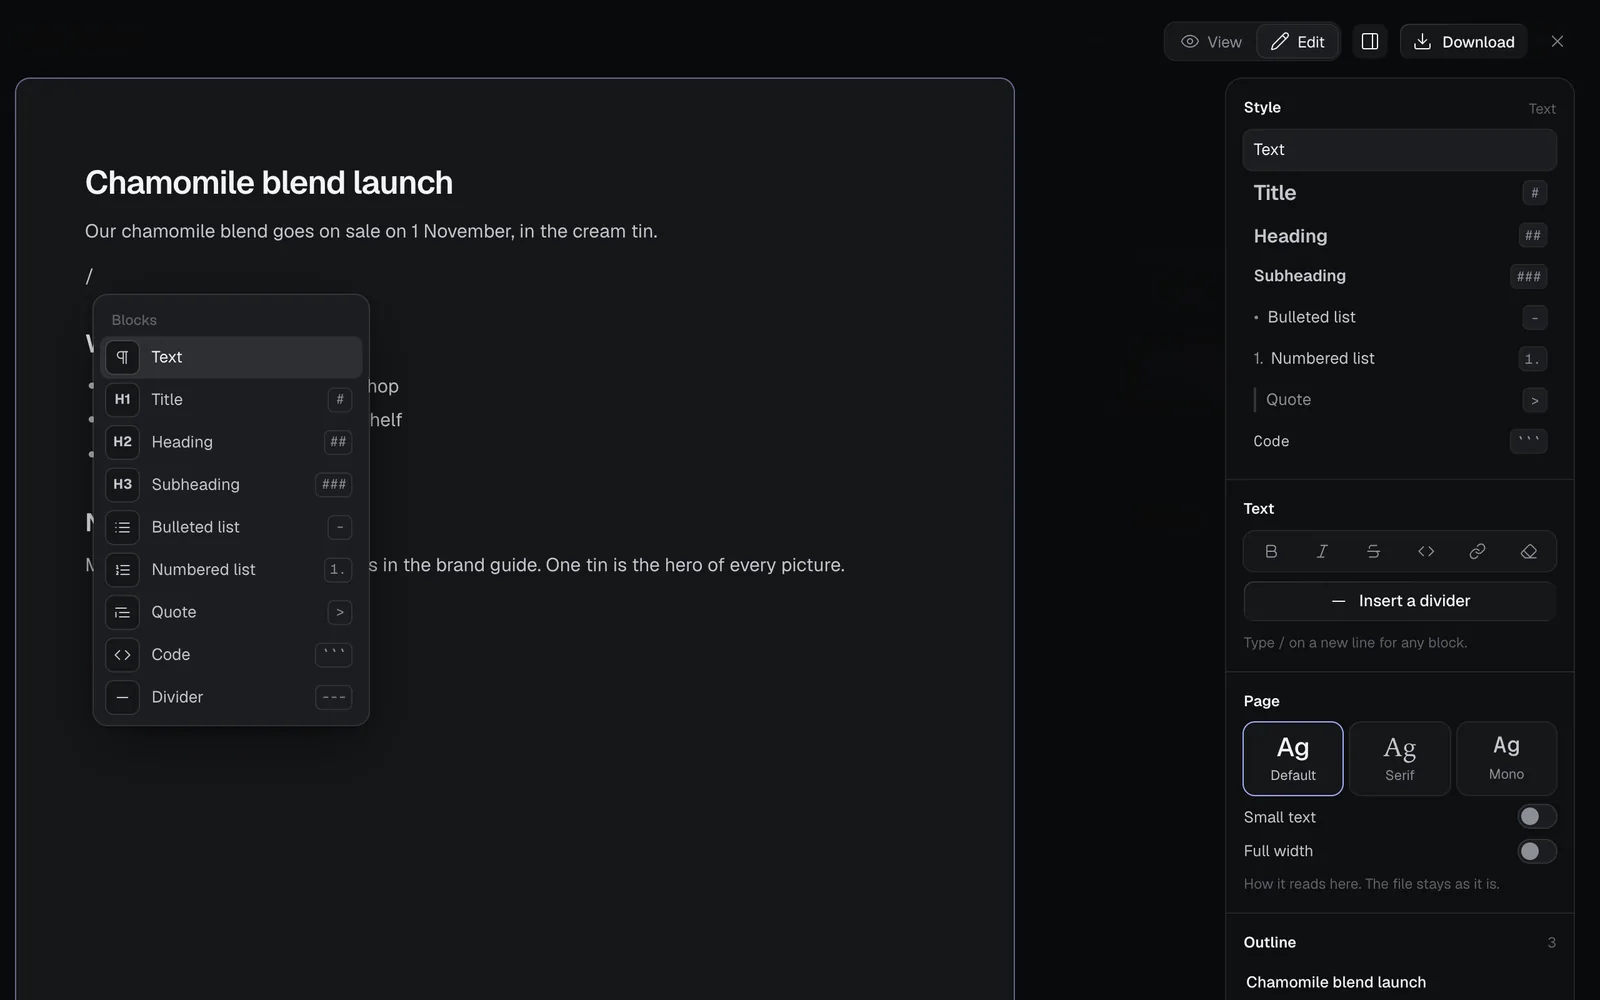
The inspector on the right (the panel button at the top shows or hides it). On View it shows a Document section with Edit (or double-click the page where you want to type); while you edit:
| Section | What it does |
|---|---|
| Style | Turns the block you're in into another kind |
| Text | Bold, italic, strikethrough, code, link, Clear formatting, Insert a divider; type / on a new line for any block |
| Page | Default, Serif or Mono, Small text, Full width: how it reads for you; the file stays as it is |
| Outline | The headings; click one to go there |
| Ask Claude | Rewrite or Add to it |
| Details | Words, characters and reading time |
Every save is one step to undo on the canvas. If someone else changed the document while you were writing, you choose: Keep mine or Use theirs.
Edit on the canvas, or ask Claude
- Edit on a Markdown document's bar edits it right on the canvas, with a small bar of styles and Done. Press Esc, click Done or click elsewhere to save.
- Select a Markdown document and use Ask Claude in the panel: say what should change or come next, then click Rewrite (it rewrites the whole document as you say) or Add to it (it keeps what's there and adds to it; ⌘Enter). Claude Sonnet 5.5 changes it in place, at no credit cost, and Undo brings back what was there. It works on any document within the size above.
Drop a PDF
Drop a PDF on the canvas and it's kept whole: the node shows its first page, and its foot gives its size, pages and words ("292 KB · 3 pages · 214 words").
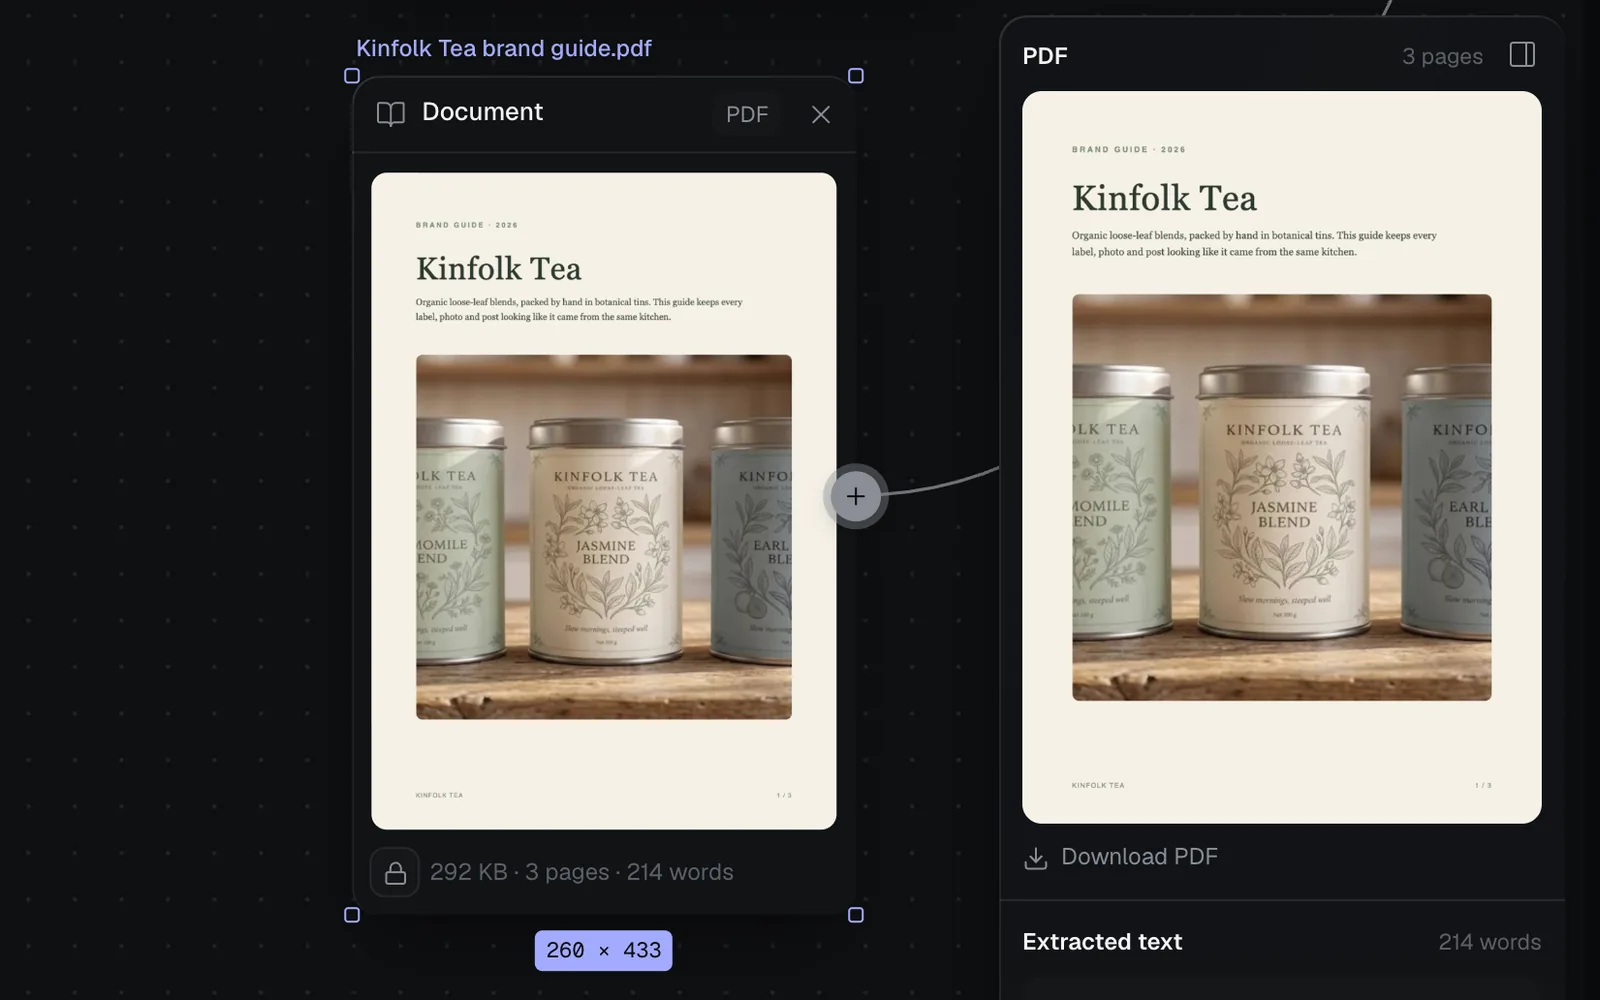
- Double-click it, or click its corner button, to read every page full screen.
- Select it for its PDF section in the panel, with Download PDF, and its Extracted text: "Connected nodes add this text to their prompt as reference notes, trimmed to fit the model's prompt limit."
- Text is read from up to the first 30 pages, and kept to a document's size (see above).
- A scanned PDF has no text to read. The canvas says "<name> has no text for prompts, only pictures." with Add pages as pictures, which adds its first 10 pages as picture references a model can look at.
A PDF counts against your plan's file size, like any upload: 1 MB each on Free (see the limits).
Use a skill (SKILL.md)
A skill is a Markdown file that teaches a model how to make a kind of work, in the format Claude's agent skills use: a name and a description at the top, then the instructions.
---
name: tea-photography
description: Photograph Kinfolk Tea tins in the house style, with warm side light on stone, linen or old wood and one tin as the hero.
---

## Light
Low morning sun from one side, soft shadows, a little haze in the air.- A file named SKILL.md, or any Markdown that starts with a name and a description, becomes a Skill node, with a wand in its header and its name and description in a box above the text.
- Add one by dropping or uploading the file, or by pasting a link to it on GitHub or GitLab: the canvas fetches the raw file.
- Wire it in like a document, or type
/in a prompt and pick it (see above). - Skills you made in Fil are in your library and show in the
/menu as "Skill in your library". Picking one adds it to the canvas beside the node, wired in. - Editing a skill keeps its name and description as they are; the full screen editor shows them above the page.
Agents connected to Fil, such as Claude Code, can add skills to a canvas too.
Turn a result into a skill
Any result can become a skill that remembers how it was made, so you or an agent can make that kind of work again.
- Click a result's node to show it in the panel, then click Turn into skill ("Write a SKILL.md from the whole flow that made this").
- A Code node named "Skill 1" appears beside it, wired from it, on Claude Sonnet 5.5 and set to Skill (SKILL.md). It waits for you: "Skill added. It reads the whole flow before it; add direction if you like, then Generate."
- Type what the skill is for in its prompt if you like ("What the skill is for (optional)").
- Click Generate. It reads every prompt, document, setting and picture that led to the result, and writes a SKILL.md. The price on the button is a range (3–54 credits here): the most is held while it runs, and the run is charged for what it uses.
The skill is kept in your library, ready for the / menu on any canvas, and Download SKILL.md in the panel saves it as a file for Claude Code or another agent. Turn into skill is on pictures, clips, models, sounds, pages and articles; not on a skill itself, a site's data or design system, a calendar or a task list.
Tips and limits
- Claude reads your documents and skills before each run and carries what matters into the prompt. Still, say the one thing that matters most in the prompt itself, or at the top of the skill.
- A long brief is cut at a document's size; split it into a short one for pictures and a full one for pages.
- Planning with Auto and Ask Claude are free. A skill run is a Code run: its price shows on Generate before you start.
- Someone you share a canvas with as a viewer can read documents full screen but not change them.
- Documents and skills are private on Starter, Pro and Max when you add them, like any node (the lock at their foot).
What's next
- Files and the library: uploads, PDFs, folders and file sizes.
- Canvas basics: nodes, links and runs.
- Chat and plans: plan a whole board from the canvas chat.
- Code generation: pages, articles and skills from a Code node.