Split an image into layers
Turn an image into layers with AI. Split the subject, text and background apart, move and restyle each layer, add text or elements, then make it one picture.
Split into layers lifts each element of a picture onto its own layer: the subject, each line of text, the things around it, and the scene behind them as the background, with what was hidden behind them filled in. Then you edit it like a design file: move, resize and turn layers, retype or restyle them, add text, drawings and new elements, and change a layer by describing it. When it looks right, keep it as one picture. Layers is on a canvas only.
Split an image into layers
- On a canvas, hover the picture and click the brush at its top right (Edit), or select its node and click Edit in the inspector.
- Click Split into layers ("Subject, background and parts, each on its own"). The picture opens full screen in Layers, with the layers on the left, the picture in the middle and the inspector on the right.
- If you like, say what to separate in What to separate (optional), such as "the mug, the headline and the line of copy". Leave it empty and the model picks the elements itself.
- Click Split into layers. The button shows what the run holds: 41 credits.
- The picture comes apart into a stack of sheets while it works, about a minute, saying what it's doing ("Looking at the picture", "Finding each element"…). Then the layers arrive one by one: "Layer 2 of 4: Mug".
Each layer is named for what it is, such as Mug or Headline. The bottom one is Background, the scene with what was behind the elements filled in, and the original picture is kept, hidden, under everything as Original. Layers are kept on the picture's node: close the view and the picture shows a badge such as 5 layers; click it (Open its layers) to come back to them.
Move, resize and turn layers
Click a layer on the picture or in the list to pick it. Then:
- Drag it to move it. It snaps to the picture's edges and middle and to the other layers, along pink guides. Hold ⌘ to place it freely, ⇧ to move in a straight line, and ⌥ to drag a copy.
- Drag a corner to resize it; it keeps its shape (hold ⇧ to free a picture). The middle of an edge stretches a picture.
- Drag the round handle above it, or just outside a corner, to turn it. Hold ⇧ for steps of 15°.
- The arrow keys nudge it; hold ⇧ to nudge it ten times as far.
The view moves with a scroll, or hold Space or use the Hand tool (H) and drag; ⌘ and scroll zooms. The percentage in the top bar opens Zoom in, Zoom out, Fit, 100% and 200%.
Change a layer in the inspector
The inspector on the right shows what's picked: its name (double-click to rename it), what kind of layer it is and its size.
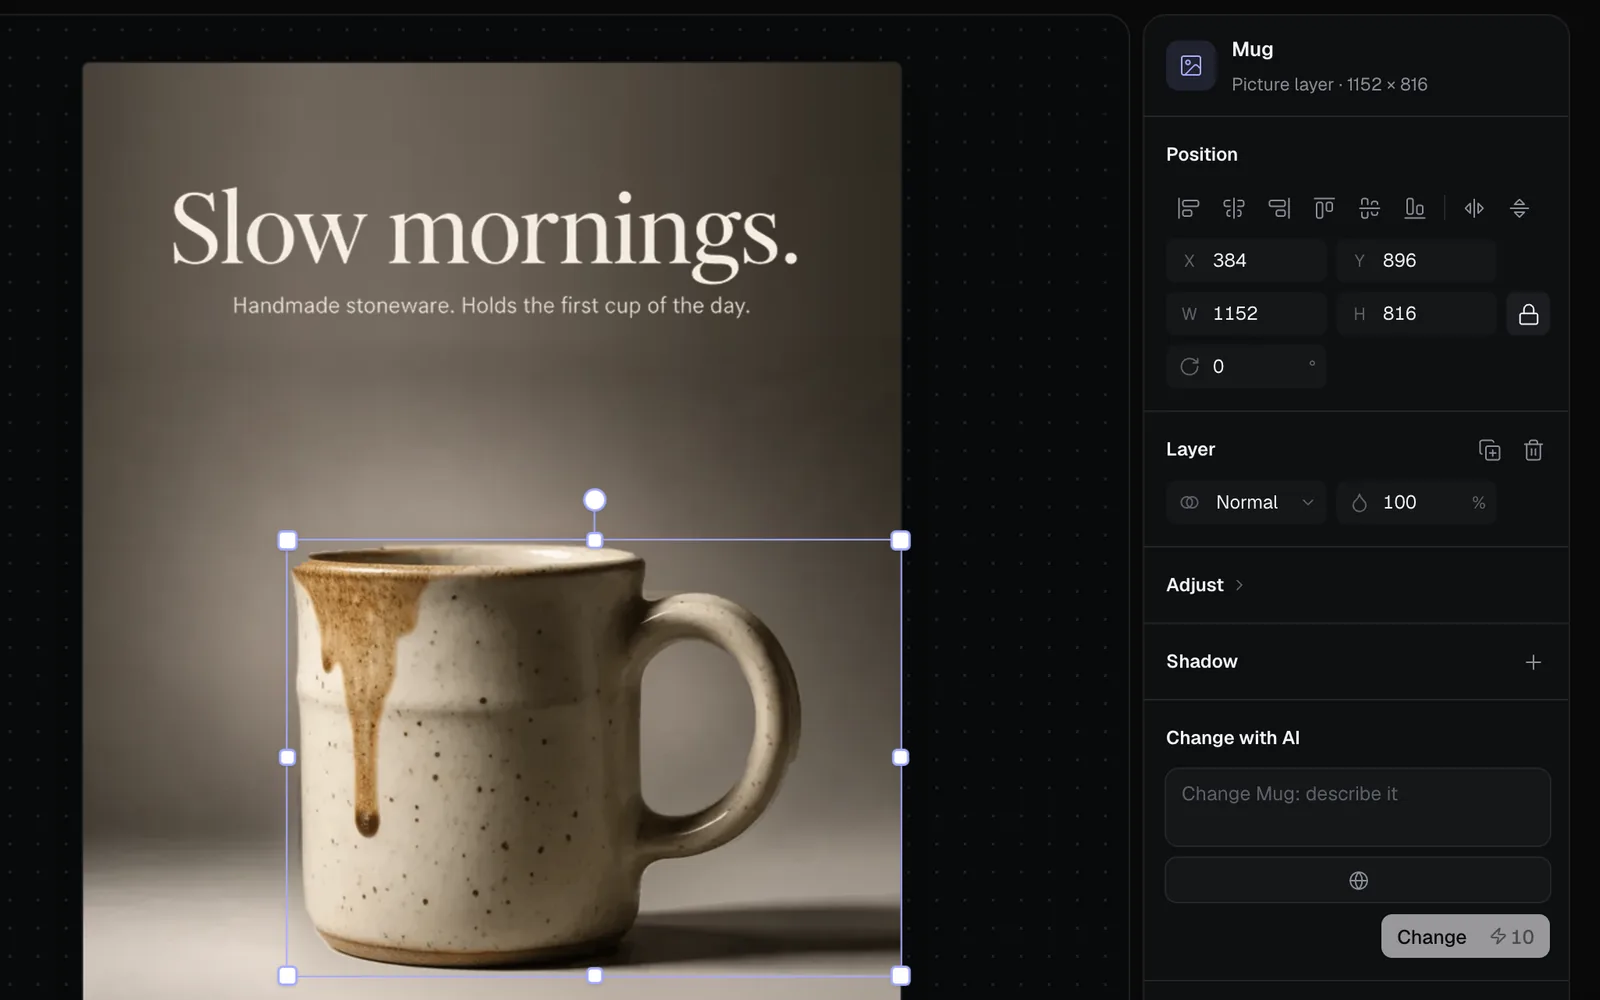
| Section | What it sets |
|---|---|
| Position | Align to the picture's edges or middle, flip, X and Y, W and H (with a lock to keep its shape), rotation |
| Layer | Blend mode (Normal, Multiply, Screen, Overlay and 12 more) and opacity, with duplicate and delete |
| Text | For text: the words, font (Sans, Serif, Display, Mono), weight, size, alignment and colour |
| Adjust | Brightness, Contrast, Saturation, Hue and Blur, with a reset |
| Shadow | + adds a drop shadow: its offset, blur, opacity and colour |
| Change with AI | Redraws this layer from a description (below) |
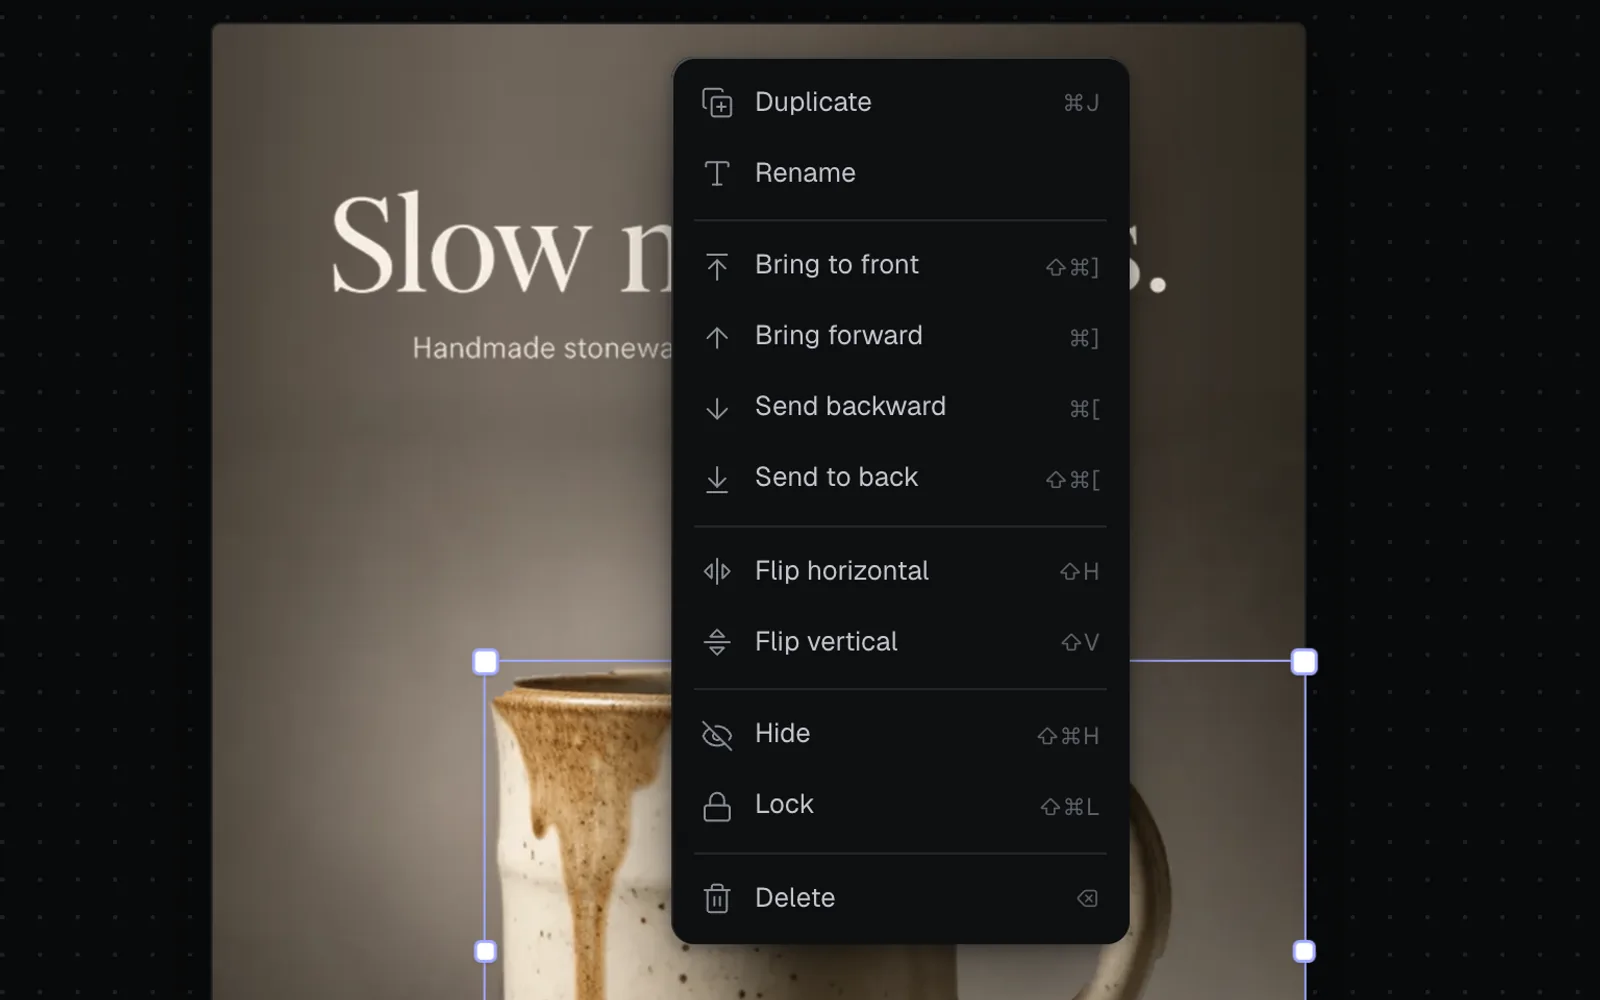
| Arrange | Bring to front or forward, send backward or to back, lock and hide |
With nothing picked, the inspector shows the picture's size and layer count and a list of Keys.
Change one layer with AI
- Pick a picture layer, such as the mug.
- In Change with AI, describe the change: "a deep cobalt blue glaze instead of the brown drip".
- Click Change. The list shows "Changing Mug…" while it runs, and the new version lands in the same place, at the same size.
The change runs on GPT Image 2.5 Flare and is drawn on transparency in the layer's style: 10 credits for a 2K portrait picture, 12 for a square one.
Add layers: pictures, text, drawings and elements
Click + (Add a layer) at the top of the list:
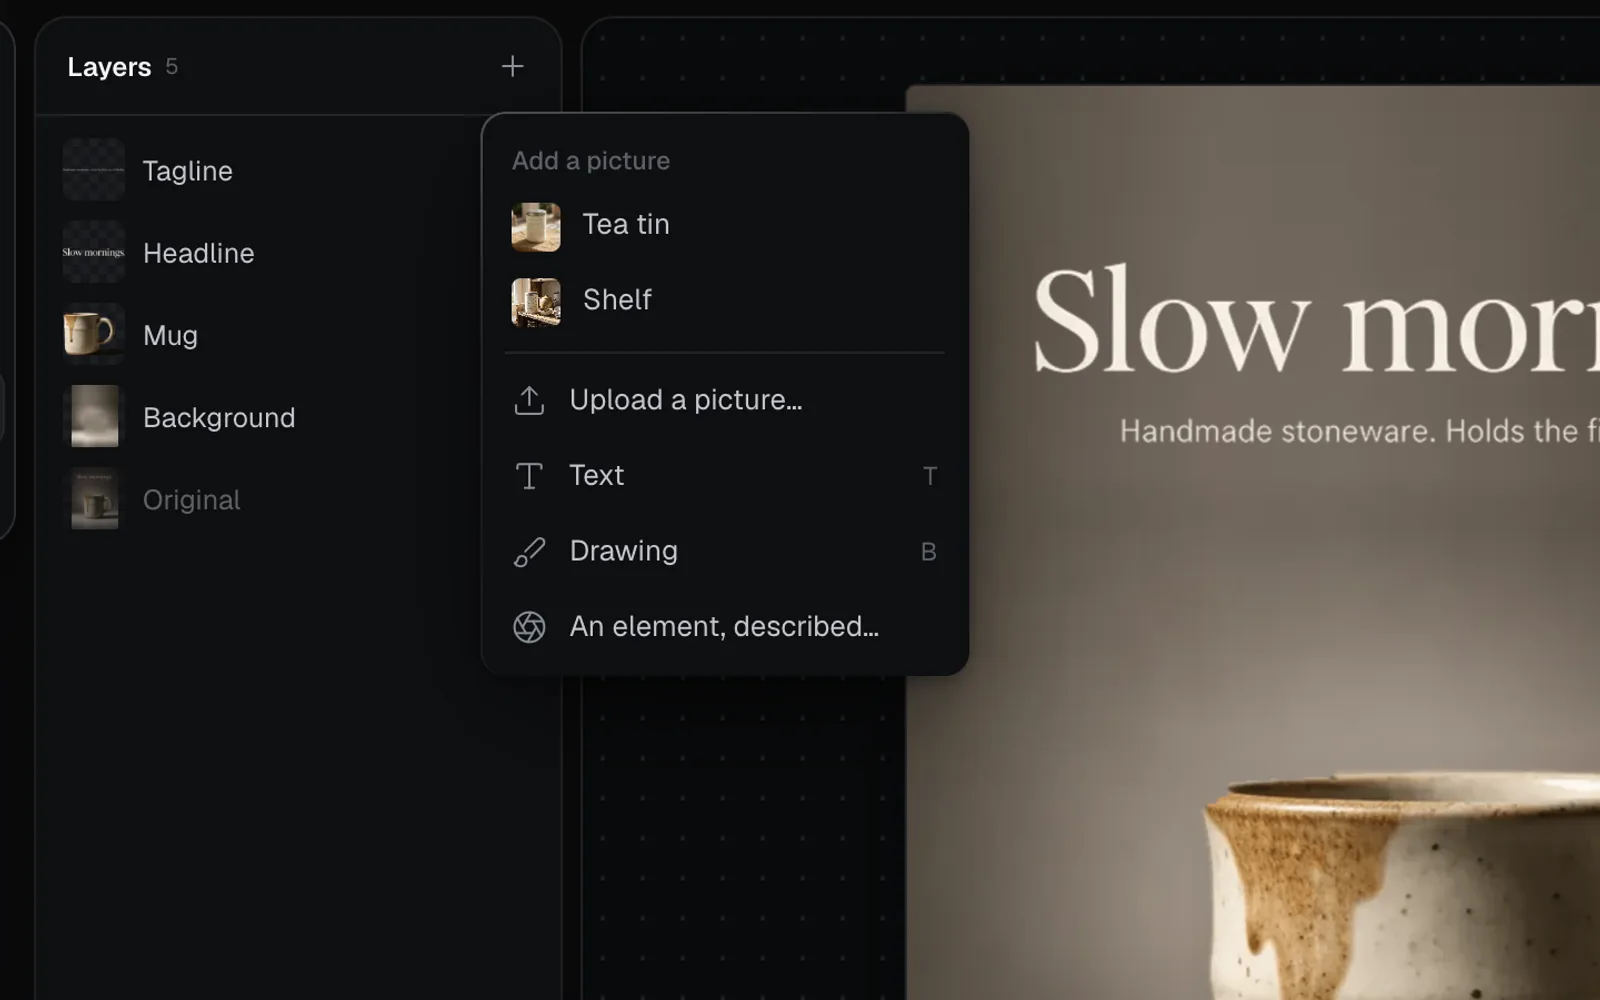
| Choice | What you get |
|---|---|
| A picture under Add a picture | One of up to 12 pictures from the canvas, placed in the middle at up to half the picture's size |
| Upload a picture… | A picture from your computer, placed the same way |
| Text | A text layer to type into, white, at the top left (T is the Text tool: click the picture to place one) |
| Drawing | The Brush (B): paint with a colour, opacity and size; Done drawing makes the strokes a layer of their own |
| An element, described… | Goes to the field at the bottom of the list (below) |
To edit text on the picture, double-click it. The Eraser (E) erases from the picked picture layer ("Pick a picture layer to erase from." if none is), and [ and ] change the brush or eraser size.
Add an element by describing it
Type what to add in Add an element: describe it, like a raven on the anvil at the bottom of the list, and click Add. It's drawn on transparency by GPT Image 2.5 Flare in the picture's style, light and perspective, and lands on top as a new layer named for what you typed: 10 credits for a 2K portrait picture.
Pick several layers and group them
⇧-click on the picture or in the list to pick more layers (⇧-click in the list picks a run of rows, ⌘-click adds or takes away one). Several picked move, resize and turn together, and the inspector aligns them to each other. Press ⌘G (or Group in the inspector) to keep them together as a group, as in Figma; ⇧⌘G ungroups.
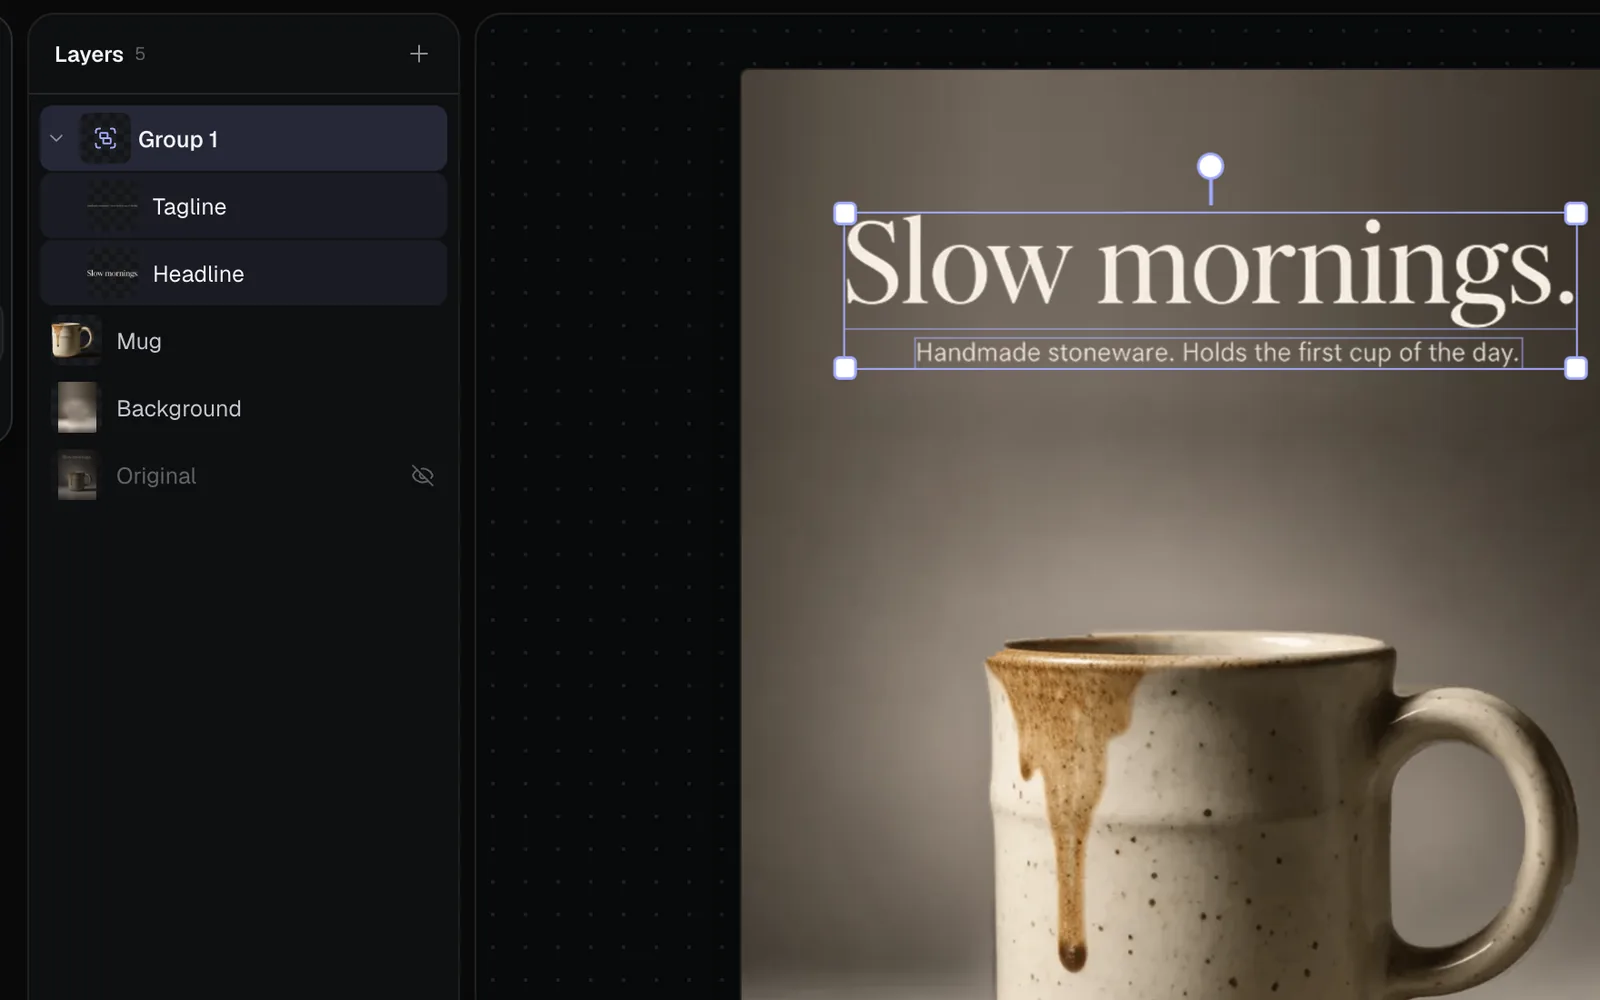
A group's row folds with its arrow, and double-clicking its name renames it. Click a layer of a group on the picture and the whole group is picked; double-click to pick that layer alone. Drag rows in the list to change the order, onto a group's row to put a layer in it, or out to take it out.
Right-click a layer for its menu, each item with its key:
Make it one picture
Make it one picture, at the bottom of the inspector, keeps what you've made:
- Save image keeps the layers as they are, flattened, as a new picture beside this one on the canvas. It's free.
- Make picture has an image model redraw the arrangement as one finished picture, blending the light, shadows and edges so the layers sit together, and keeping any text as written. Add a note in Anything to say about it (optional), and pick the model and resolution from the chips: it starts on the model your image runs start on. It costs a run of that model (7 credits on Nano Banana 2.1 at 2K), and the picture joins this image's grid on its node: "The picture is ready, in this image's grid." Click View it to see it.
- Download, in the top bar, saves the arrangement as a PNG.
To turn the layers into a short video instead, see Animate layers into a video.
Keyboard shortcuts
These work in Layers when you're not typing in a field.
| Keys | What they do |
|---|---|
| V, H, T, B, E | Move, Hand, Text, Brush and Eraser |
| Space + drag, ⌘ + scroll | Pan, zoom |
| ⌘+, ⌘−, ⌘0, ⌘1 | Zoom in, zoom out, fit, 100% |
| ⌘Z, ⇧⌘Z | Undo, redo (up to 60 steps) |
| ⌘J, ⌫ | Duplicate, delete |
| ⌘G, ⇧⌘G | Group, ungroup |
| ⌘], ⌘[ | Bring forward, send backward (⇧ for front and back) |
| ⇧H, ⇧V | Flip horizontal, flip vertical |
| ⇧⌘H, ⇧⌘L | Hide, lock |
| ⌘A | Pick every layer that shows and isn't locked |
| Esc | Step back: out of a preview, the brush, a group, the selection, then close |
Tips and limits
- A split returns up to 16 layers and the background. Pictures with clear, separate things (a product, words on a plain backdrop, a character in a scene) split best.
- Edits to layers are free. Only the split, Change with AI, a described element and Make picture use credits, and each shows its price on its button.
- Layers is on a canvas only: it keeps the layers on the picture's node. In the Library or the Image view, the Edit tab has the other tools. To use a picture from there, add it to a canvas first (see Files and the library).
- An SVG made in code has only Inpaint, not Layers.
What's next
- Animate layers into a video: play each layer from where it started to where you put it, and export an MP4.
- Image editing: every tool in the Edit tab.
- Upscale and remove the background: cut a subject out without splitting the whole picture.
- Edit part of an image: change one area of a picture in place.