Dynamic websites with data
A Website in Fil keeps its content in a data node, a small CMS: edit products, posts and details as collections and every page that shows them updates.
A Website keeps its content apart from its design, in a Data node: the site's details, its products, its posts, each kept as entries in a collection. Pages show the data rather than holding their own copy of it, so you change a price, a post or the tagline once and every page that shows it updates. You can type in the data on the canvas, edit it in a table like a CMS, or ask Claude or an agent to change it.
Edit website content on the canvas
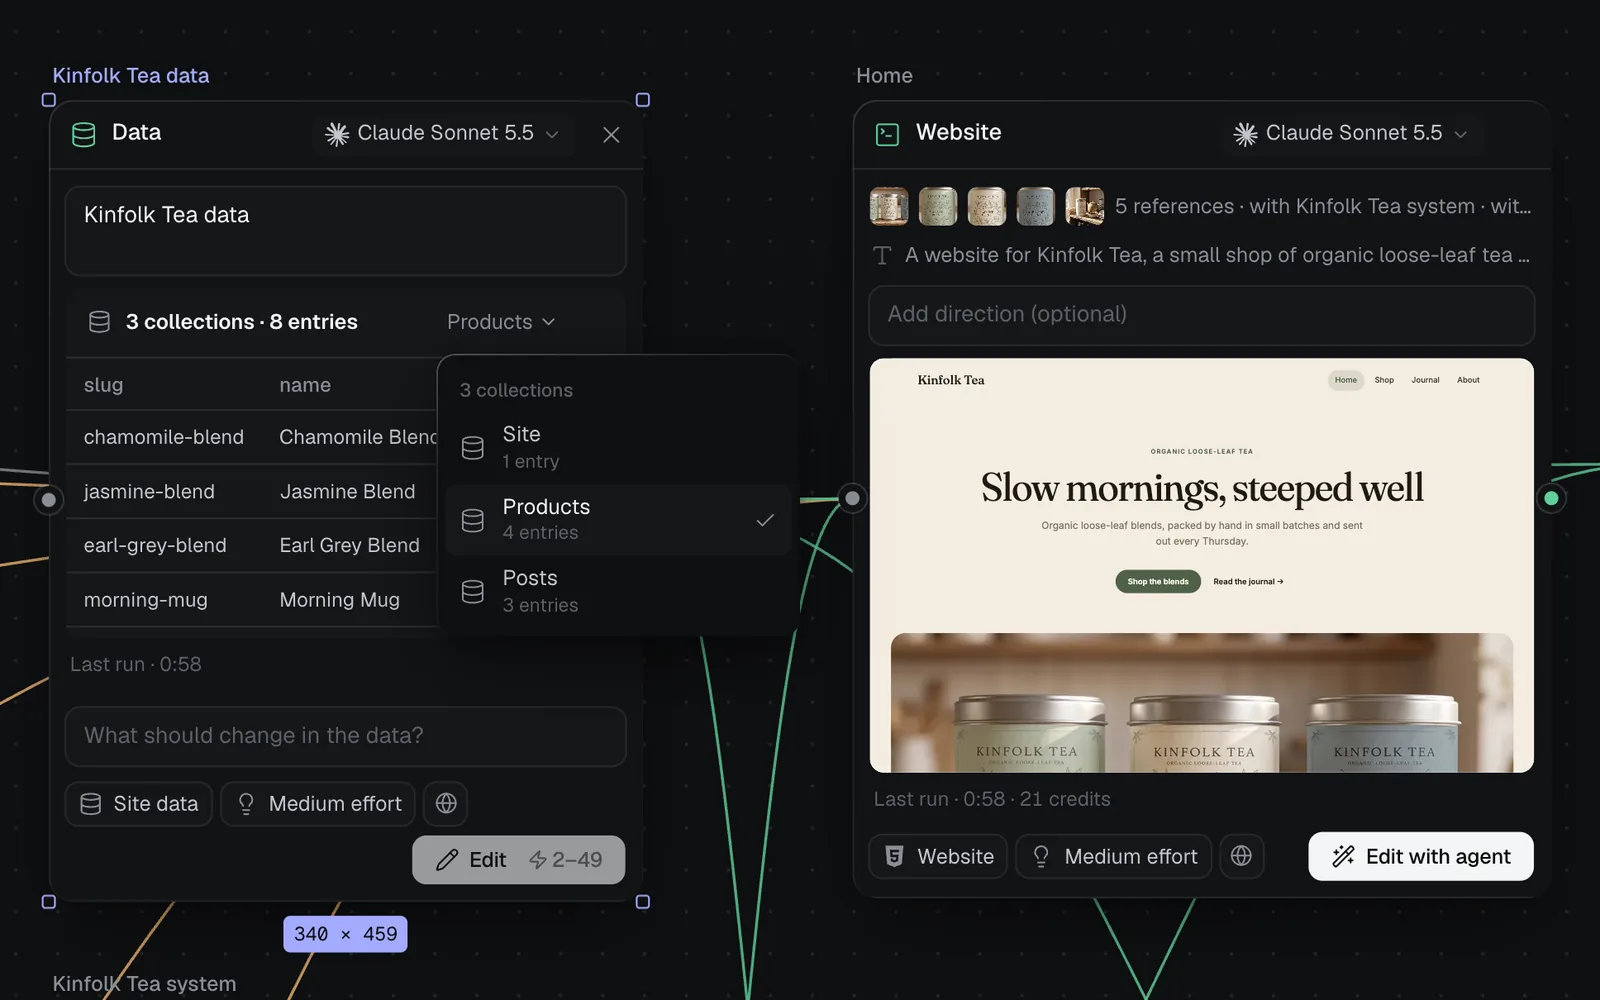
- Find the site's data node, headed Data and named after the site ("Kinfolk Tea data"). Its first line counts what it holds: "3 collections · 8 entries".
- To see another collection, click its name at the top right of the table (it starts on the first list, such as Products) and pick one: Site, Products or Posts.
- Double-click a cell and type. Text, numbers, dates, links and tags are typed in place; a yes-or-no cell switches with a double-click.
- Press Enter to finish, Tab to move to the next cell, or Esc to cancel.
What you type shows on the pages beside it as you type, before anything is saved. About a second after you stop, the change saves as a new version of the data, free, and every page that shows it is updated too. A message says how many: "Saved. Updated 2 pages."
A page that's open in the Design tab with unsaved changes isn't updated; the message names it, so you can open it and bring the change in.
Collections, entries and fields
A site's data is a set of collections. A list collection, such as products or posts, holds entries, one for each product or post; a single-entry collection, such as the site's own details, holds one. Every entry has the same fields: a product's name, notes, price, weight and photo.
| Part | In Kinfolk Tea | What pages do with it |
|---|---|---|
| A single entry | Site: name, tagline, email, city | Show it wherever it's needed, such as every footer |
| A list | Products: 4 entries | Repeat a card once for each entry |
| A field | price, photo, featured | Fill a part of the card: its price, its picture |
Each entry has a slug, its short name in addresses ("chamomile-blend"), which follows the entry's name until you type one of your own.
Open the data editor (CMS)
Select the data node and click Edit data in its properties on the right (or Kinfolk Tea data in a page's Pages list in the Design tab).
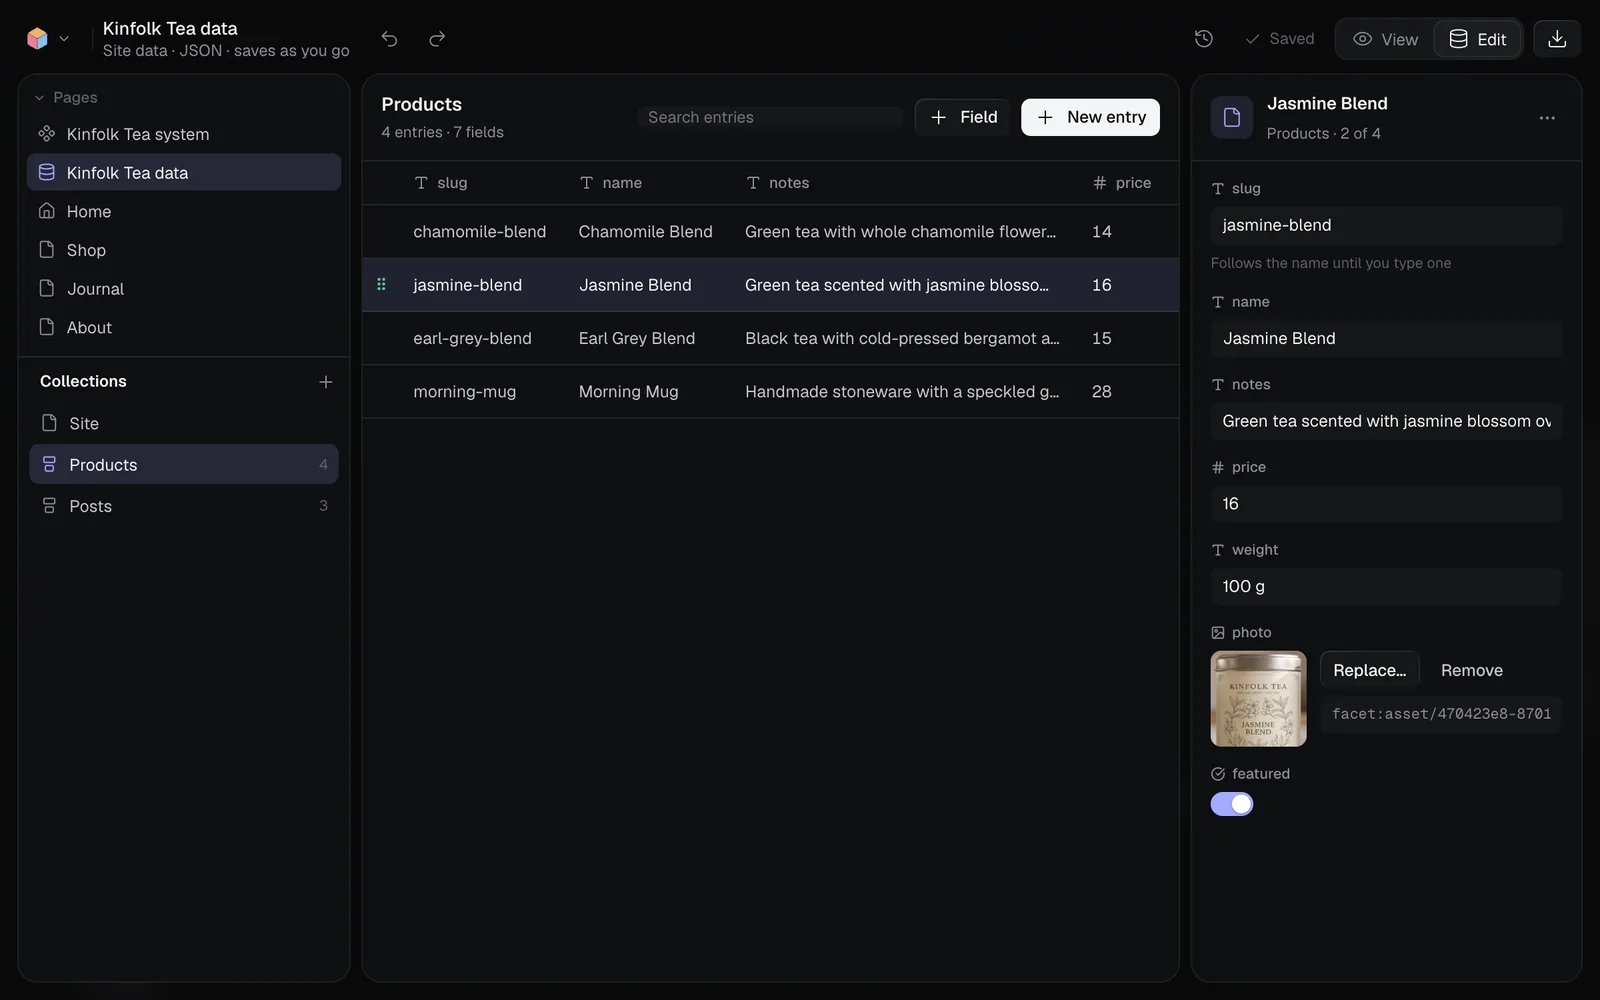
- Collections, on the left, lists every collection with its count; click one to open it.
- The table shows its entries. Search entries finds one; drag an entry by its grip to change the order, which every list on the pages follows.
- The panel on the right edits the entry you picked, one field at a time. Its ⋯ menu (Entry options) has Duplicate, Move up, Move down, Move to the top, Move to the bottom and Delete entry.
- Changes save as you go, each a new version; the top bar says Saved. ⌘Z undoes and ⇧⌘Z redoes.
- Version history (the clock at the top) opens earlier versions: Restore this version brings one back, and the pages follow it.
Add a collection, an entry or a field
- For a collection, click + beside Collections (Add a collection), type its name, such as "Stockists", and press Enter. It starts with two fields, slug and name.
- For an entry, click New entry. It's named "New entry" until you type its name in the panel on the right.
- For a field, click Field and pick its type. It's added to every entry of the collection, empty, ready to fill.
To rename a field, change its type or delete it, click its column's heading (its tooltip reads, for example, "Text · click to rename or change its type"). Changing the type converts the values it can.
Field types
| Type | Holds | Edited with |
|---|---|---|
| Text | Words: a name, a line | A text box |
| Rich text | Paragraphs with bold, links, headings and lists | A small editor with its toolbar |
| Number | A price, a count | A number box |
| Yes or no | Featured, in stock | A switch |
| Date | A post's date | A date box |
| Image | A picture from your library or a link | Replace… and Remove |
| Link | A web address or another page | A text box |
| Tags | A list of words | Words separated by commas |
| Data (JSON) | Anything else, as JSON | A code box |
Replace… on an image opens Choose an image: Upload… from your computer, any picture in your library, or a link with Use link.
How pages show the data
A page made as part of a Website is bound to its data as it's written: a heading shows the site's tagline, and a grid repeats a product card once for each product. You see and change those bindings in the Design tab.
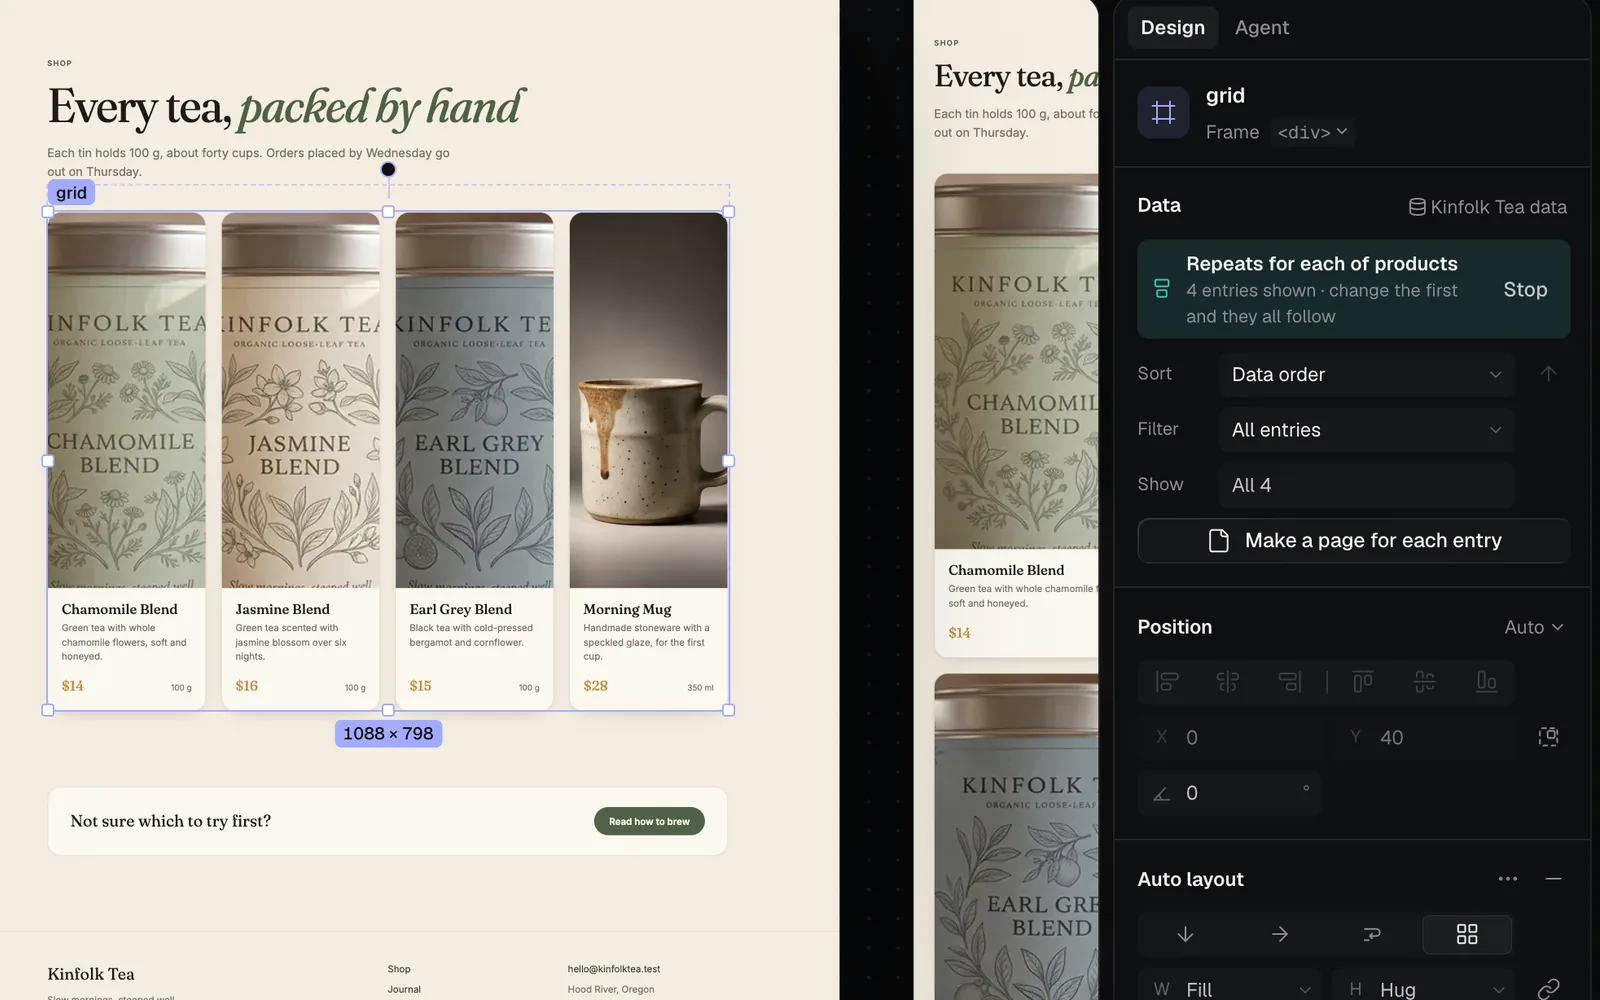
- Select a list on the page (a grid of cards) and its Data section says Repeats for each of products. Sort orders it by a field or keeps the data's order, Filter shows only some entries (a field that "is set", or "price" that "is less than" 20), and Show limits how many: a home page can show three products and the shop all of them. Stop ends the repeat.
- Select one part of an entry, such as its name or its photo, and the section shows where it comes from, such as products › #2 › name. Click Disconnect from data to keep what it shows as its own.
- Select a layer that isn't bound and click Connect to data to show a field there.
- Show only when… shows a layer only while a field is on or has something in it, such as a "New" badge for featured products.
- Typing on bound words on the page changes the data too, and the site's other pages follow when you save.
To change the layout of every product card at once, edit the first one: its layers change in every entry, and what it shows still comes from each entry. See The Design tab.
A page for each entry
A list can have a page for each of its entries, such as a page for every product, designed once:
- In the Design tab, click + beside Pages and pick Detail page for Products (under A page for each entry), or select the list and click Make a page for each entry. Both are free.
- The new page, "Products detail", has the site's header and footer, a link back to the list, the entry's picture, name and fields, all bound to the entry. Its address is /products/ followed by each entry's slug, and its title and description come from each entry.
- The bar below the page names the entry it shows, such as Chamomile Blend, 1 of 4: use its arrows, or pick an entry from its menu, to see another.
- To link the list to these pages, select the list and tick Link to each entry’s page.
A detail page isn't added to the site's navigation: visitors reach it from the list. When the site is published, every entry gets its page, at its own address; see Publish a website.
Add site data to a canvas
Every Website brings its own data node, made from its first page. To add one yourself, right-click the canvas and choose Add site data…:
| Pick | What you get |
|---|---|
| Make it with AI | A Code node set to Site data: describe the site, and you confirm the cost when it runs |
| Import a file… | A data node from a JSON, CSV or SQL file |
| Start from a blank one | The site's details and one collection to fill in |
Wire a data node into a Code node before it runs and the new pages show it, adding any collections they need to it. A dropped .json, .csv or .sql file becomes a data node too.
Change content with AI or an agent
- With a sentence: type what to change in the data node's "What should change in the data?" box, such as "add a fourth blend, Rooibos, at $15", and press Edit: 2–49 credits on Claude Sonnet 5.5. The result is a new version, and every page follows.
- With an agent: an agent connected to Fil can read a site and change its content with the set_data tool: set a field (such as site.tagline or products.chamomile-blend.price), add entries or remove them. Each change is a free new version, and the pages follow at once. See MCP tools.
Limits
- A site's data can be up to 2 MB.
- A data node is a JSON, CSV or SQL file. JSON holds any number of collections; a CSV file holds one ("A CSV file holds one collection. Make a JSON data file for more."); SQL keeps each table as a collection.
- Sort and filter can't use image, rich text or JSON fields.
- React apps keep their content in a data node too, edited the same way; see React apps.
What's next
- Build a website: make the site whose content this is.
- Design systems: change colours, type and components across every page.
- Publish a website: put the site, and a page for every entry, online.
- MCP tools: let an agent keep the content up to date.