Edit the timeline
Trim, split, reorder and delete clips on the video editor's timeline. Scenes stay together as you edit, with snapping, lanes, zoom and keyboard shortcuts.
The timeline along the bottom of the video editor is where you shape the cut: trim scenes, split them, put them in a new order and take parts out. The scenes are magnetic, like a story, so they stay together as you work: shorten one and the rest move up, drag one between two others and they make room.
The timeline at a glance
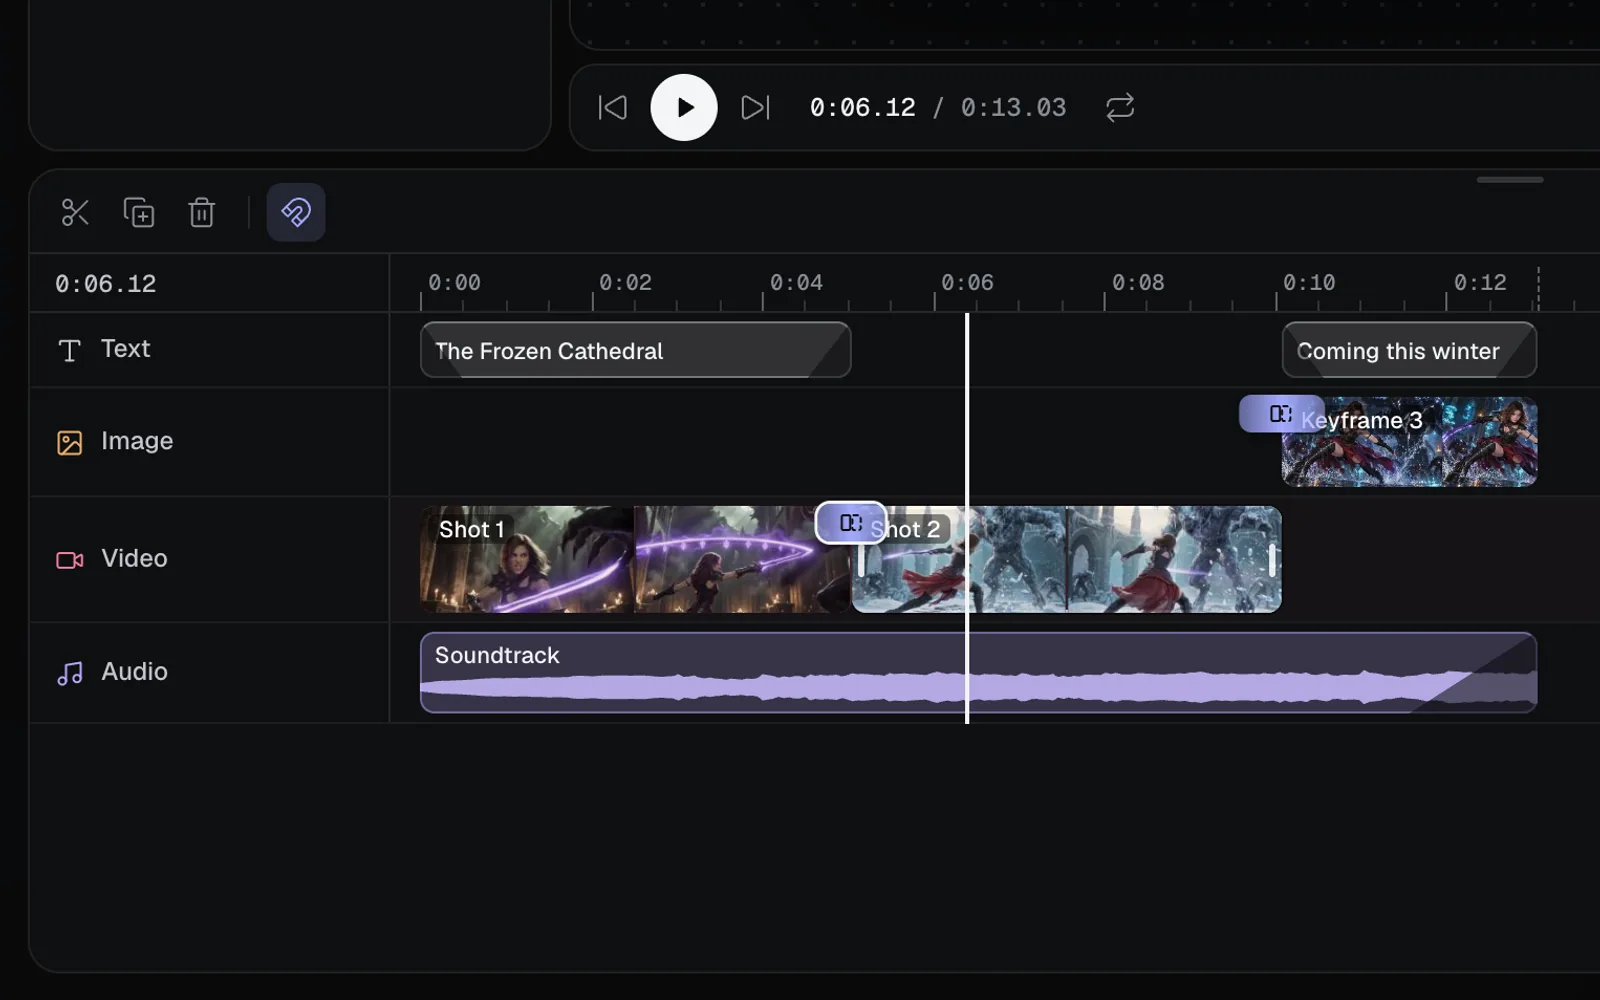
| Part | What it does |
|---|---|
| The bar | Split at playhead, Duplicate, Delete and Snapping, then the clip count and length, and the zoom |
| The ruler | The time, in seconds. Click or drag it to move the playhead |
| The lanes | Text, Image, Video and Audio, top to bottom. A lane higher up draws over the ones below |
| The clips | A video shows its frames, a picture itself, a sound its waveform, and words their text, with the clip's name |
| The cuts | Where one scene meets the next: point at the timeline to see a button there for a transition |
A clip also shows its speed when it isn't 1× (2×), a ramp where it fades or animates in and out, and a tick for each keyframe. The time at the top left of the lanes is where the playhead is.
Scenes stay together
Videos and pictures that meet end to start play as one run of scenes, the story of your video, on whichever lane they sit. The timeline keeps them together:
- Trim a scene's end and the scenes after it move with it, so there's no gap or overlap.
- Delete a scene and the cut closes up.
- Drag a scene over others and it goes in at the nearest cut, the rest making room. A line shows where it will go.
- Words and sounds that start after the change move with it, and music that ran to the end of the scenes still ends with them.
Words and sounds aren't part of the story: they stay where you put them.
Select clips
- Click a clip to select it, and ⇧-click or ⌘-click to add or remove others.
- Drag across an empty part of the lanes to select every clip the box touches. ⌘A selects them all.
- Click an empty part of the lanes to move the playhead there and let go of the selection. Esc lets go too.
- On the stage, click what you see to select the clip that's drawn on top there.
With one clip selected, the inspector on the right shows its settings. With several, it shows what they share: Length, the Transitions into those that are scenes, and how they come in and go out.
Trim a clip
Drag either end of a clip, its grip, to make it shorter or longer.
- Click the clip to select it.
- Point at its left or right edge and drag. With snapping on, a line shows when the edge meets another clip's edge or the playhead.
- Let go. A video or sound can't run past the start or end of its file; a picture or words can run as long as you like.
Trimming the end of a scene moves the scenes after it. Trimming the start of a scene that follows another keeps it against that one: its file starts later (or earlier), and the scenes after it move up to meet it.
For exact numbers, use Timing in the inspector: Start, Length, and for a video or sound From (where in its file it starts). Changing Length works like dragging the end.
Move and reorder scenes
Drag a clip by its middle to move it.
- A scene goes in at the nearest cut when you drag it over the story, and the scenes around it close up behind it and make room in front of it. Drop it on an empty stretch of another lane of its kind and it stays exactly there, playing over what's below (picture in picture: make it smaller in Layout, see Transitions, speed and keyframes).
- Words and sounds move freely, to another lane of their kind too. A clip that would cover another goes to a free lane of its kind, and a new lane (Text 2, Audio 2) is added when there isn't one.
- Hold ⌥ as you drag to move copies and leave the clips where they were.
- Hold ⌘ as you drag to place a clip without snapping.
Split a clip at the playhead
- Move the playhead to where you want the cut: click the ruler, or step with ← and →.
- Select the clip, then press S (or ⌘B), or click Split at playhead (the scissors) at the left of the timeline's bar.
- The clip is now two, and the second half is selected.
With nothing selected, S splits every clip under the playhead, words and sound too, but those on locked lanes. The first half keeps how the clip comes in (its animation, fade and transition), and the second half how it goes out. If the playhead isn't over the selected clip, the editor says "Move the playhead over the clip to split it there." With nothing under the playhead, it says "Nothing under the playhead to split."
Delete clips and close gaps
- ⌫, or Delete in the bar, removes the selected clips. A scene cut out of the story closes up, and everything after it moves back, words and sound included.
- ⇧⌫ (Delete and close gap) closes the gap on the clip's own lane, whatever the clip: what comes after it on that lane moves back. Use it for words and sound, whose gaps ⌫ leaves.
- ⌘X cuts the selected clips, to paste somewhere else.
Copy, paste and duplicate
- ⌘C copies the selected clips ("Copied 2 clips"), and ⌘V pastes them at the playhead, keeping their spacing. A pasted scene that lands on another goes in at the nearest cut.
- ⌘D, or Duplicate, puts copies straight after the clips. Copies of scenes go into the story, and the scenes after them make room.
Snapping
With Snapping on (the magnet in the bar, N), a clip you move or trim meets the start, the playhead and the edges of the other clips when it comes within a few pixels. Its tip reads "Snapping on: clips meet edges and the playhead (hold ⌘ to place freely)". The editor remembers your choice.
Lanes: overlays, mute, hide and lock
Each kind of clip has its own lane, and a lane is added when clips of a kind overlap: Video 2 sits above Video and draws over it. Point at a lane's name to see its buttons:
| Button | What it does |
|---|---|
| Mute | Silences the lane's videos or sounds, in the preview and the export |
| Hide | Leaves the lane's words, pictures or videos out of the frame and the export |
| Lock | Keeps its clips from being moved, trimmed or picked on the stage |
Empty extra lanes go away by themselves.
Zoom and scroll the timeline
- + and −, or the magnifiers and the slider at the right of the bar, zoom in and out around the playhead.
- ⌘ and scroll, or pinch, over the lanes zooms around the pointer.
- Fit (⇧Z) shows the whole edit, as it does when the editor opens.
- Scroll sideways to move along the edit. While it plays, the timeline turns the page to keep the playhead in view.
Right-click a clip
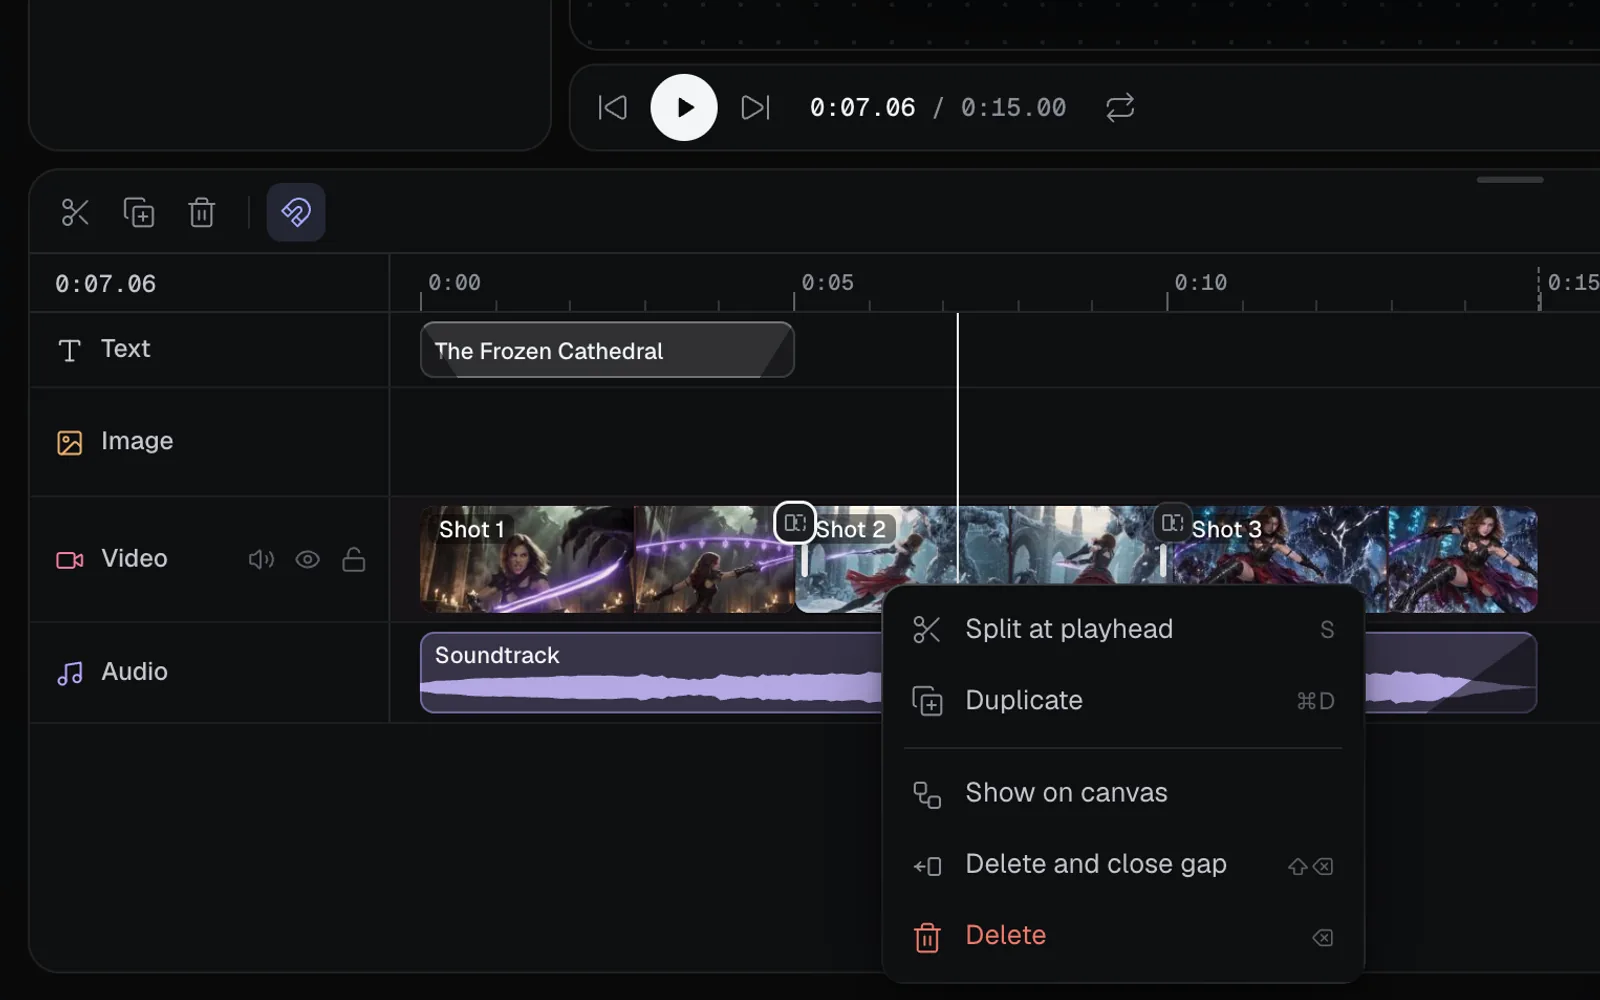
The menu has Split at playhead (when the playhead is over the clip), Duplicate, Show on canvas for a clip that came from a node (it closes the editor and selects that node), Delete and close gap and Delete.
Keyboard shortcuts in the video editor
These work when you're not typing in a field. With nothing selected, the inspector lists the main ones under Shortcuts.
| Keys | What they do |
|---|---|
| Space or K | Play or pause |
| ←, → | A frame back or on (⇧ for a second) |
| Home, End | To the start, to the end |
| S or ⌘B | Split at the playhead |
| ⌫, ⇧⌫ | Delete, delete and close the gap |
| ⌘D | Duplicate |
| ⌘A | Select all clips |
| ⌘C, ⌘X, ⌘V | Copy, cut, paste at the playhead |
| ⌘Z, ⇧⌘Z or ⌘Y | Undo, redo |
| ⌥ + drag | Drag a copy |
| ⌘ + drag | Move without snapping |
| N | Snapping on or off |
| L | Loop on or off |
| +, − | Zoom the timeline in or out |
| ⇧Z | See the whole edit |
| Esc | Let go of the selection, or leave a field |
For the studio's other keys, see Keyboard shortcuts.
Tips
- Every change is one step to undo, up to 100 of them, and the edit saves as you go.
- If you drag a scene and it jumps to a cut you didn't want, drop it on an empty stretch of another lane instead, or hold ⌥ to drag a copy.
- Trimmed-off parts of a video aren't lost: drag the grip back out, up to the file's own length.
What's next
- Transitions, speed and keyframes: blend the cuts and animate clips.
- Add text and titles: words over your scenes.
- Add music, voice and sound: the sound under them.
- Export and render videos: make the MP4.