Organize a canvas
Keep a busy Fil canvas tidy. Group nodes in sections, add notes and comments, align nodes, tint the canvas, file it in a project, restore it from the Trash.
As a canvas grows, sections keep each part of the job together, notes say what a node is for, and comments let your team talk beside the work. Everyone on the canvas sees them live. This page covers sections, notes, comments, names and colours, aligning, projects, and moving a canvas to the Trash and back.
Group nodes in sections
A section is a named frame under your nodes, as in Figma. Moving the section moves everything in it.
- Select the nodes to group: drag a box across them on an empty part of the canvas, or ⇧-click each one.
- Click Section in the toolbar (the frame icon), or press ⇧S. A section wraps them with room for its title, named Section 1 (then 2, 3…), with its name ready to type.
- Type a name and press Enter.
- Drag the section by its title to move it. Every node whose middle is inside it moves too, and so does any smaller section inside it.
With nothing selected, a new section is 960 × 640 in the middle of the view, ready for you to drag nodes into. Click a section's title to pick it: handles appear on its corners and edges to resize it, down to 240 × 160. Double-click the title, or pick it and press Enter, to rename it (up to 80 characters).
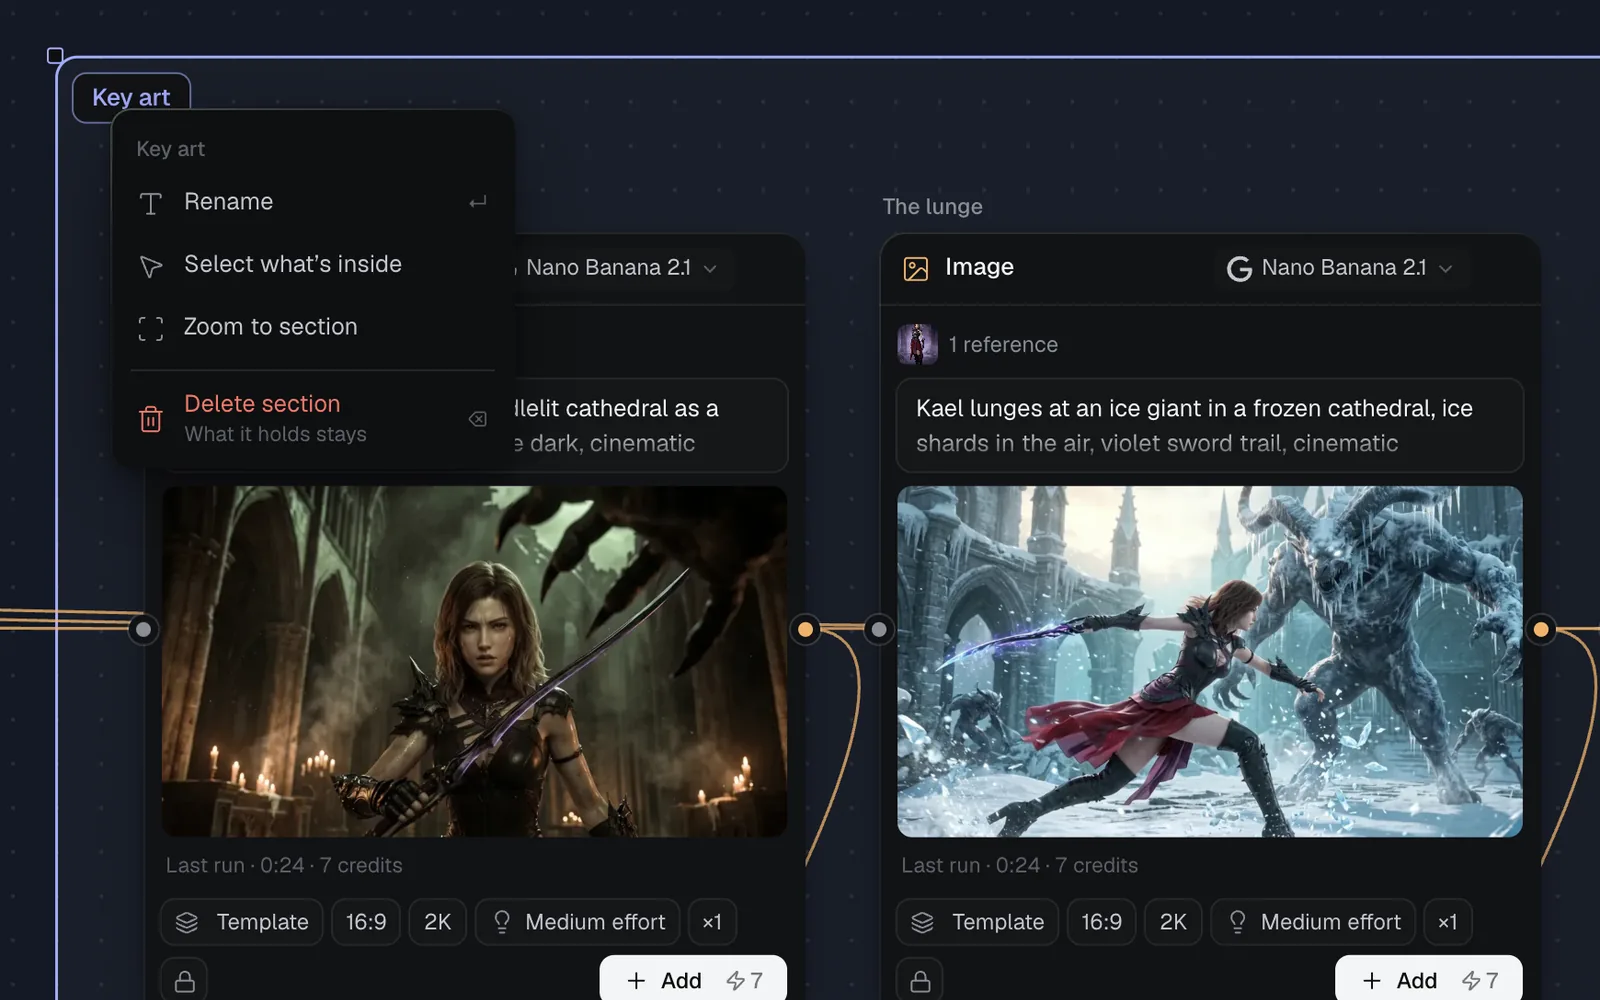
- Select what’s inside selects its nodes, ready to move, run or align together.
- Zoom to section fills the view with it.
- Delete section removes only the frame: its nodes stay where they are. Picking the title and pressing ⌫ does the same.
- Sections snap to the grid; hold ⌥ while dragging to place one freely. Titles keep their size at any zoom, and sections show on the minimap.
Add notes to nodes (annotations)
A note is a card beside a node with a line to it, as in Figma's Dev Mode: say what a node is for, what to watch for, or what comes next. It follows its node when the node moves.
- Click Annotate in the toolbar, or press ⇧T.
- Click the node the note is about. (Click an empty spot for a note that stands on its own.)
- Type the note, then press ⌘Enter or Esc, or click away. A note left empty is dropped.
- Click the label at the top of the card to give it a category: Note, Development, Interaction, Accessibility or Content. The last four each have a colour; Note is plain.
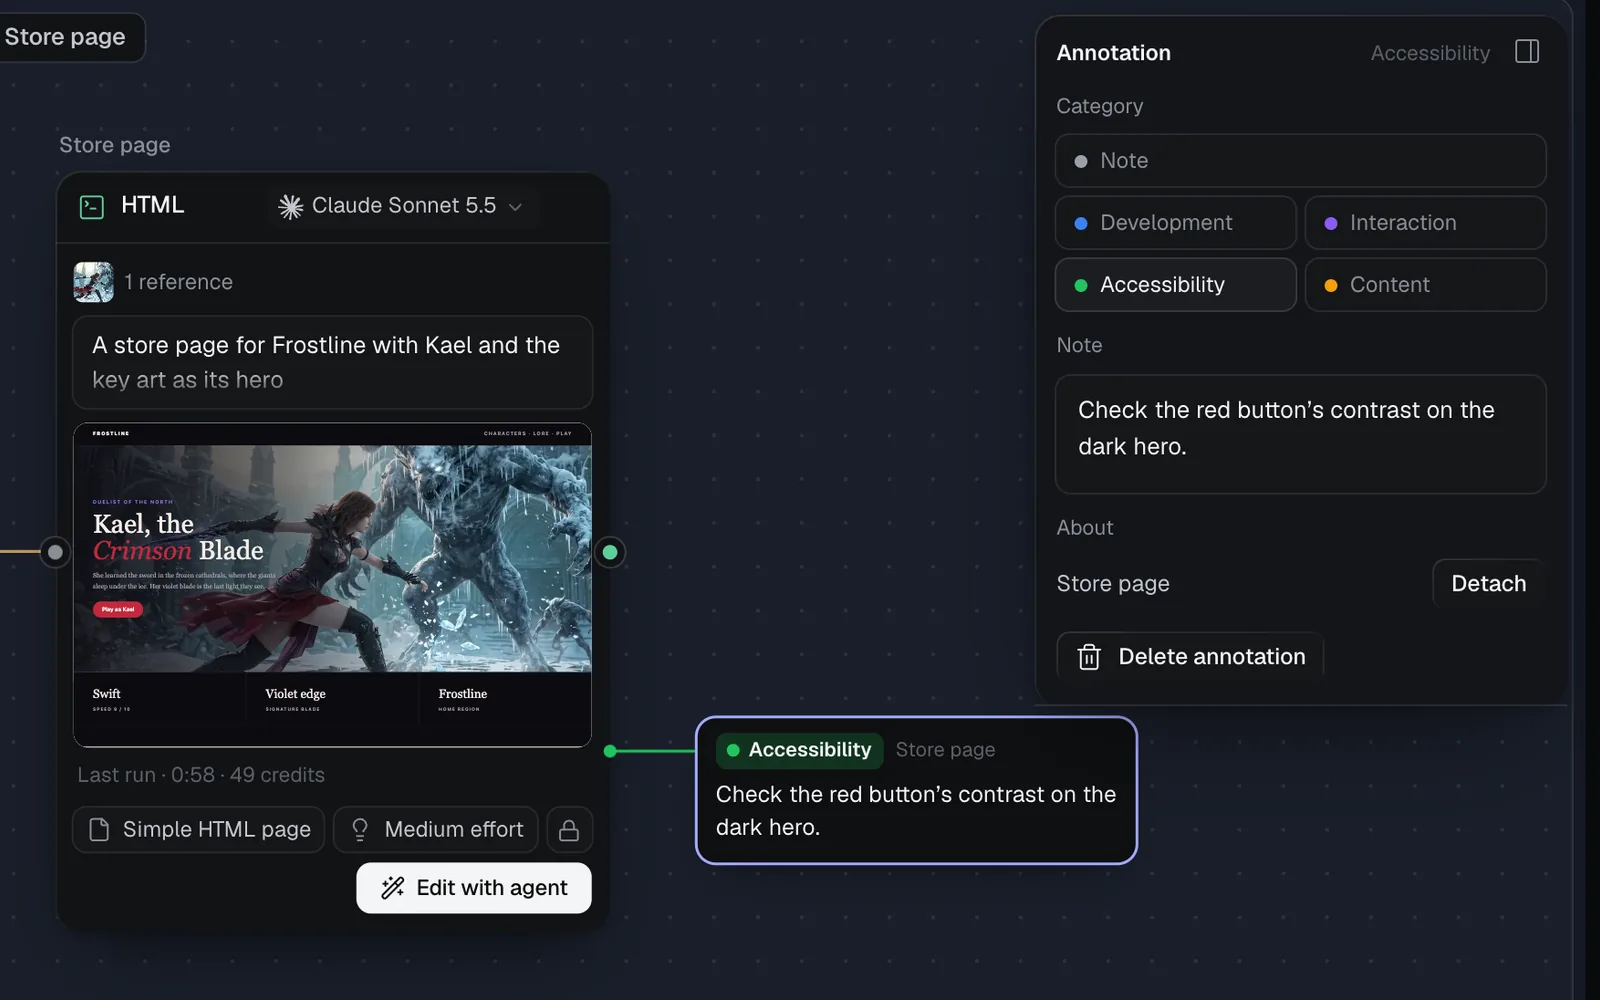
- Drag a card to move it; it keeps its new place beside its node.
- Double-click a card, or pick it and press Enter, to edit it. A picked note shows in the panel, where Detach leaves it standing on its own and Delete annotation removes it.
- ⇧N hides or shows every note. With nothing selected, the panel lists them under Annotations: click one to go to it.
- Deleting a node deletes its notes too, and Undo brings them back with it.
Comment on a canvas
- Click Comment in the toolbar, or press C.
- Click a node or an empty spot. A New comment box opens there.
- Type your comment and press Enter to post it. ⇧Enter starts a new line.
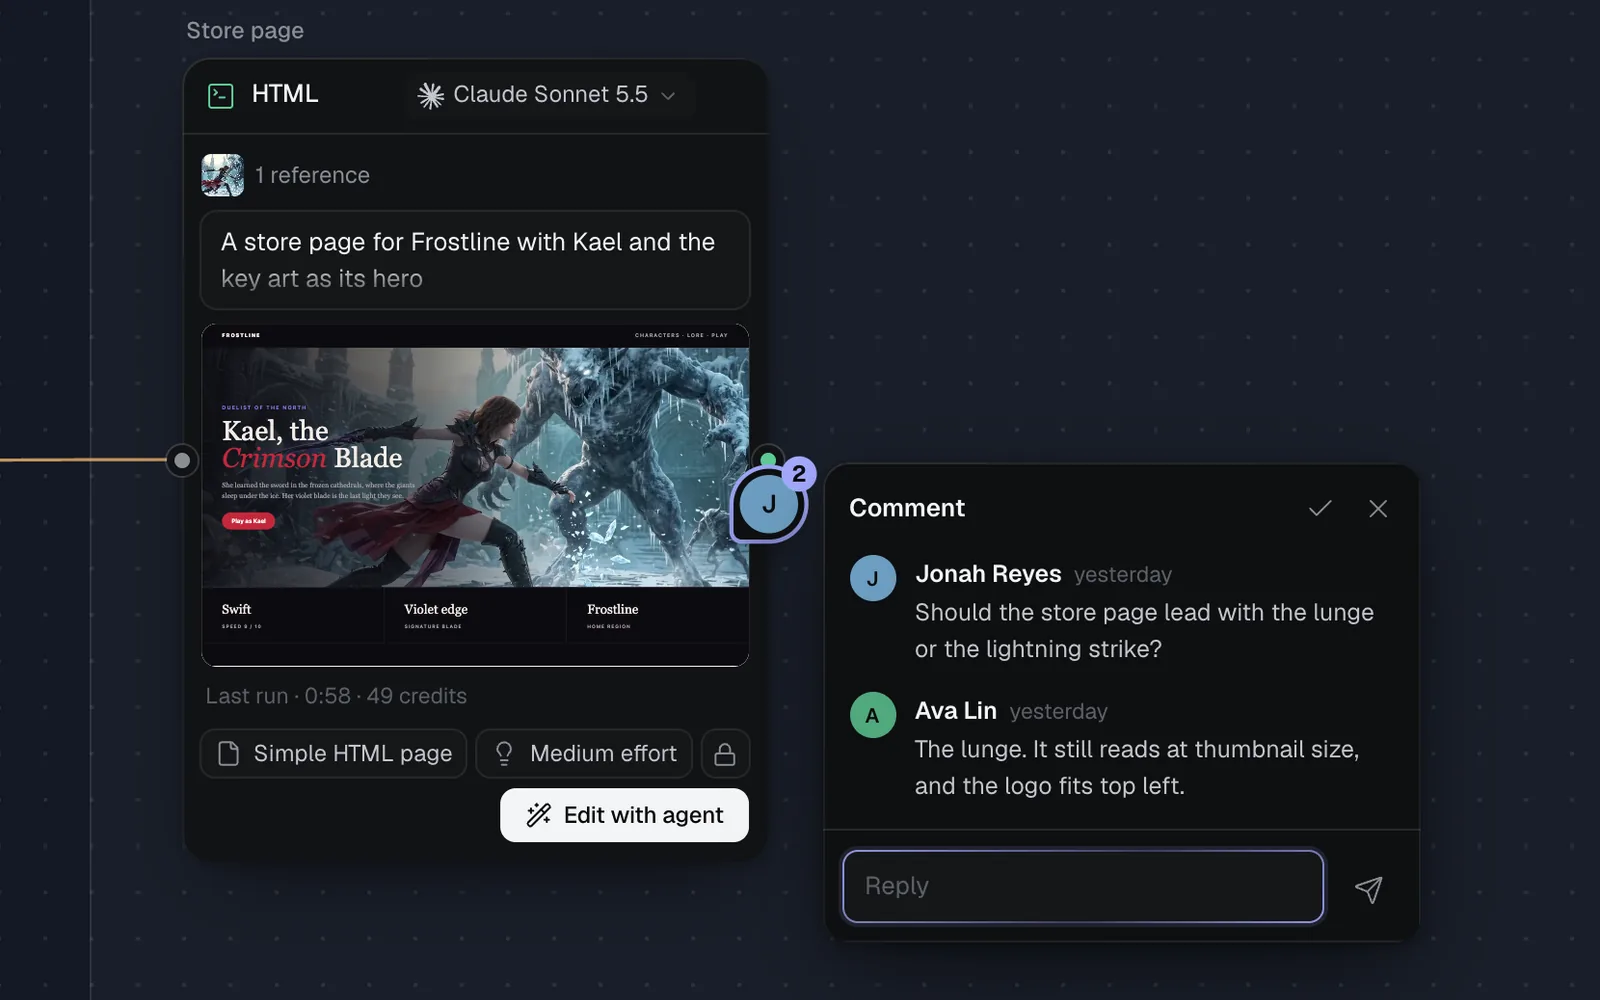
- A comment on a node follows it. Its pin shows the author's picture, and how many comments the thread has once someone replies; a ring marks new ones.
- Click a pin to open its thread. Type in Reply to answer, click the tick (Resolve) to put it away, or the × to close it.
- You can edit or delete your own comments, and drag your own pin somewhere else. The thread's author and the workspace owner can delete the whole thread.
- Resolved threads hide from the canvas. The Layers tab and the panel (with nothing selected) list every thread; Show resolved · N (with how many) brings the resolved ones back to reopen.
- ⇧C hides or shows every pin.
Anyone who can open the canvas can comment, including people it's shared with as viewers, but only editors add notes or change the canvas's look. A comment can be up to 5,000 characters.
Name nodes and canvases
- Double-click a node's name above it, or right-click the node and choose Rename. Names can be up to 60 characters.
- To leave a line under a node, such as where a file comes from or what it's for, select it and type in Note in the panel on the right.
- Click the canvas's name in the top bar to rename the canvas. It's also how it's listed in the sidebar, on Home and in the Trash.
Clear names pay off in the Layers tab and the @ menu, which list nodes and files by name.
Change the canvas color and background
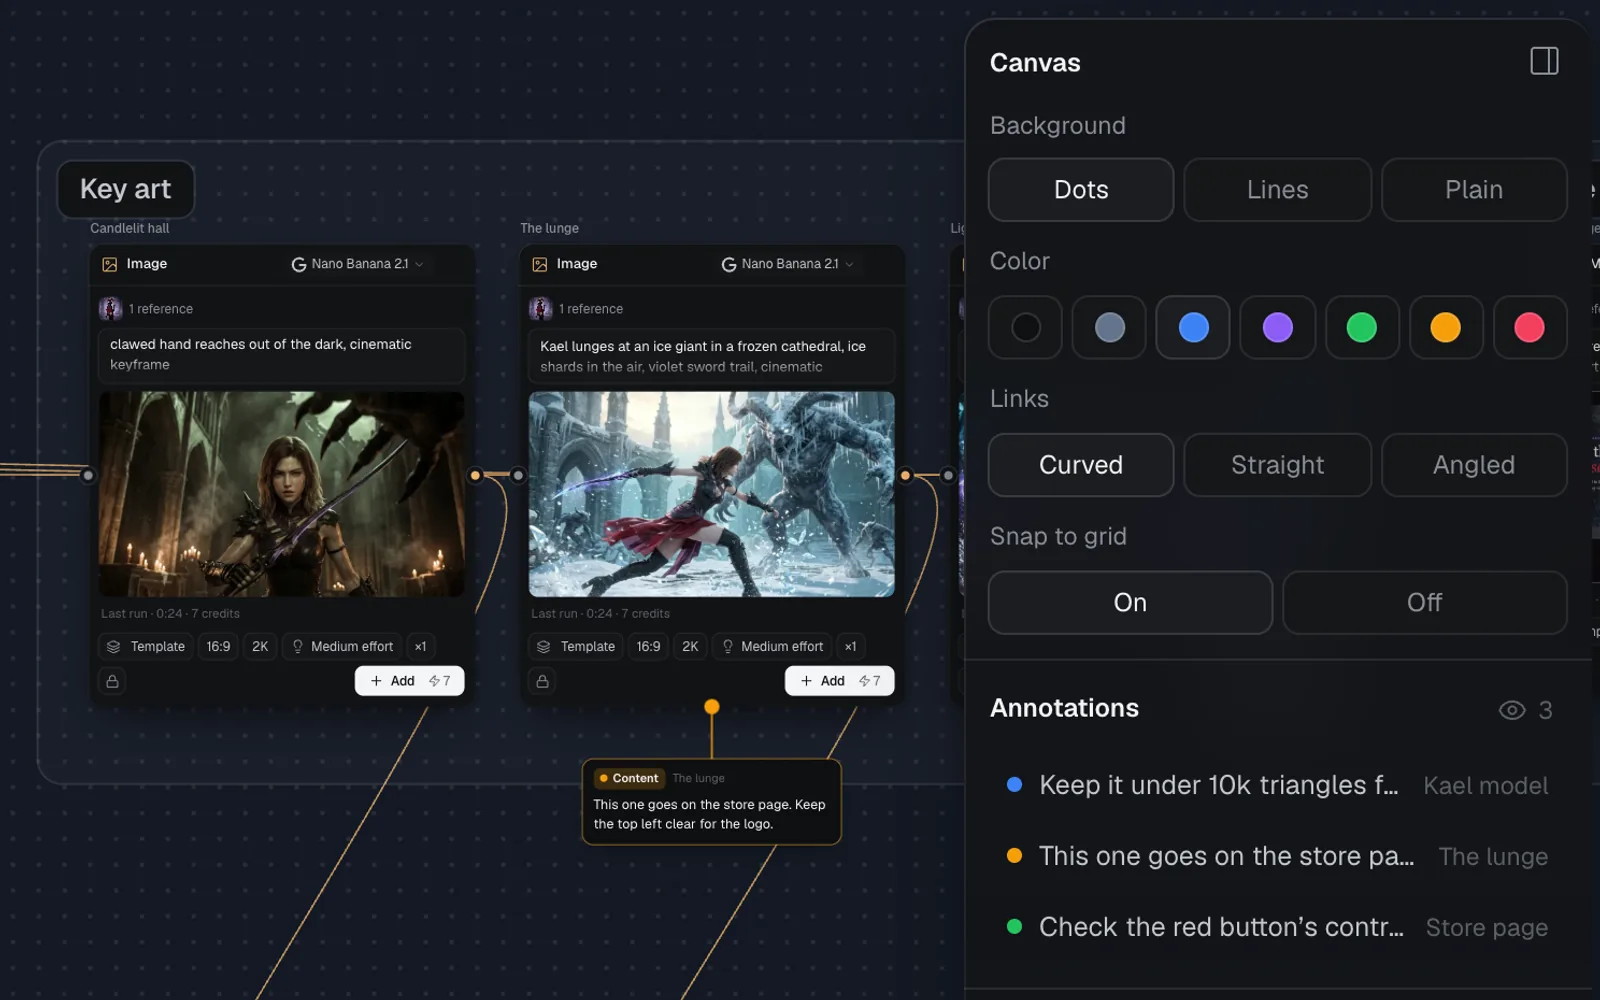
Click an empty spot to select nothing, then click Show properties at the top right. The Canvas section at the top of the panel sets the canvas's look, which everyone on it sees.
| Setting | Choices |
|---|---|
| Background | Dots, Lines or Plain |
| Color | Default, Slate, Blue, Violet, Green, Amber or Rose, a tint that works in light and dark themes |
| Links | Curved, Straight or Angled |
| Snap to grid | On snaps moved nodes to a 24 px grid; Off doesn't. Nodes still snap to each other's edges |
A tint is a quick way to tell canvases apart. A duplicate keeps its canvas's look.
Align and distribute nodes
- Select two or more nodes.
- In the panel on the right (click Show properties at the top right if it's closed), under Align, click a button: Align left, Align horizontal centres, Align right, Align top, Align vertical centres or Align bottom.
- With three or more, Distribute across or Distribute down makes the gaps between them equal.
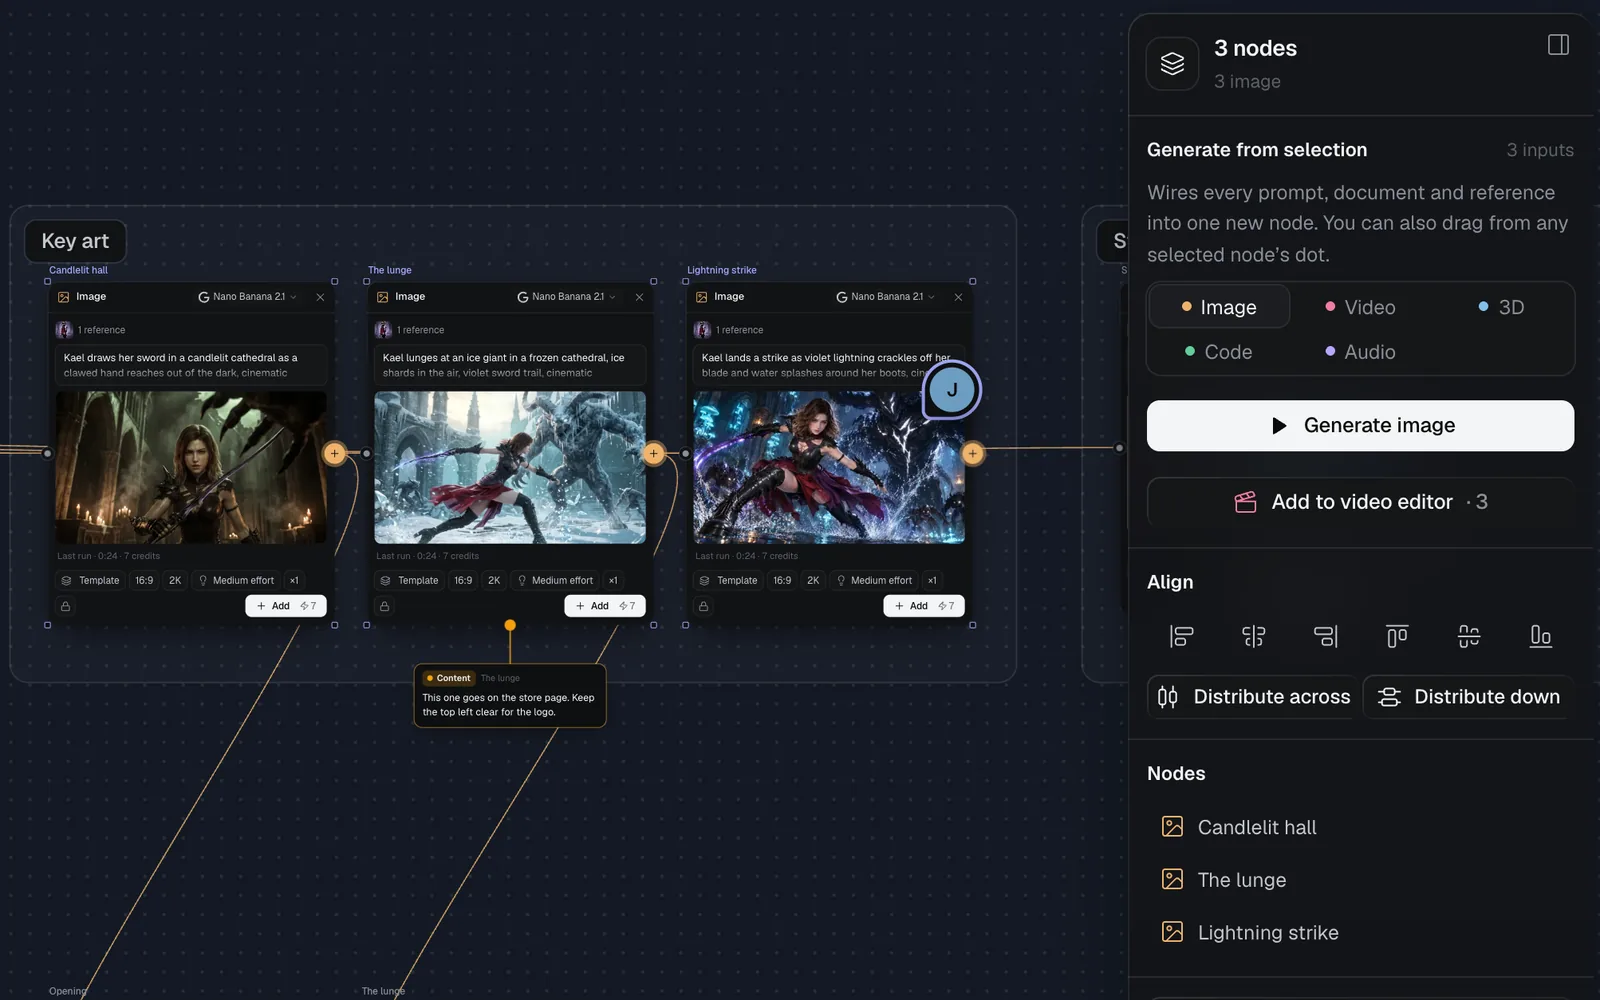
Each is one step to undo. The same panel can wire everything selected into one new node (Generate from selection) or run them all.
Put canvases in projects
A project groups canvases and their files: a client, a launch, a game.
- Click the + beside Projects in the sidebar (its tip reads New project), or choose New project in ⌘K.
- Type a name and click Create project. The project opens in the Library.
- To file a canvas in it, drag the canvas's row in the sidebar onto the project. Or right-click the row (or click ··· on its card on Home), choose Move to project and pick the project.
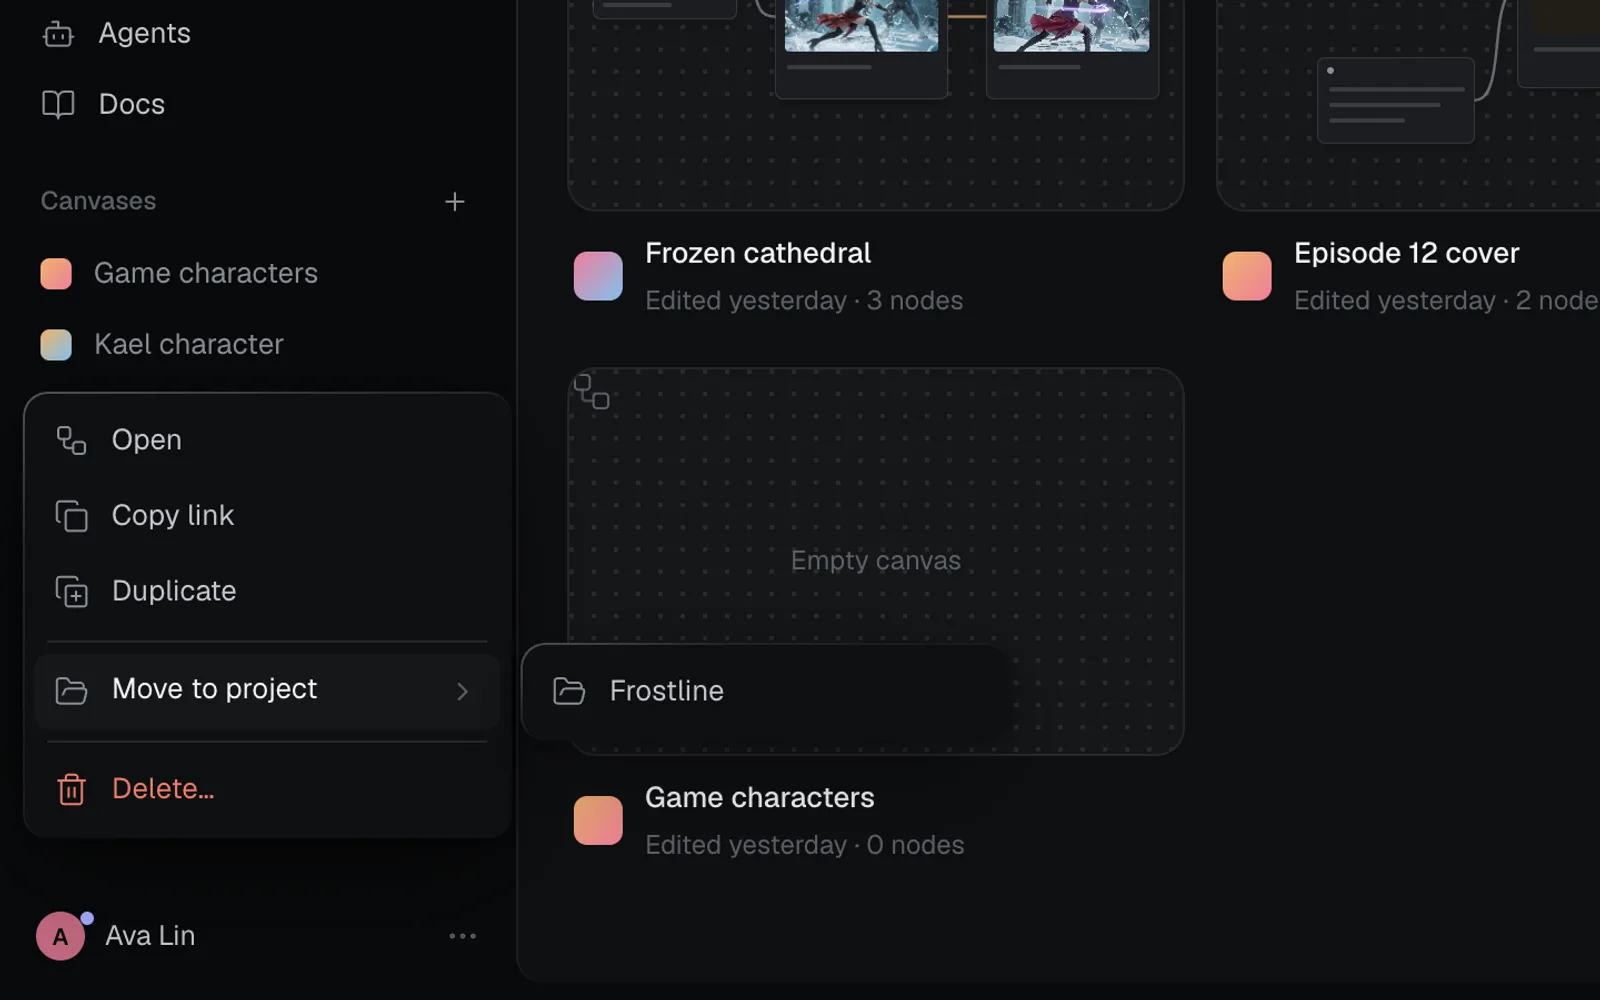
The canvas's project shows at the start of its top bar, where Drafts was; click it to open the project in the Library. Remove from project, in the same menu, puts a canvas back in your drafts. In the sidebar, the arrow beside a project shows its canvases.
Duplicate a canvas
Choose Duplicate canvas in the canvas menu (click the canvas's name at the top of the left panel), or right-click its row in the sidebar and choose Duplicate. The copy, "Kael character copy", has every node and link, the same look, project and thumbnail, but not its chats. Set one canvas up the way you like it and duplicate it to start the next project the same way. People a canvas is shared with from outside the workspace can't duplicate it, since its files stay in its workspace.
A canvas's card on Home shows a miniature of it. Right-click a node and choose Set as thumbnail to show that node's result instead; Restore default thumbnail, in the same menu or the canvas's menu in the sidebar or on Home, goes back.
Delete or restore a canvas
- Open the canvas menu and choose Delete canvas…. Or right-click the canvas in the sidebar, or click ··· on its card on Home, and choose Delete….
- The dialog says the canvas "moves to the Trash, in the Library, where it can be restored", and that the files made on it stay in the Library. Click Move to Trash.
- The message that follows has Undo.
To bring it back later, click your name at the bottom of the sidebar and choose Trash (or choose Trash in ⌘K). Deleted canvases are listed above deleted files.
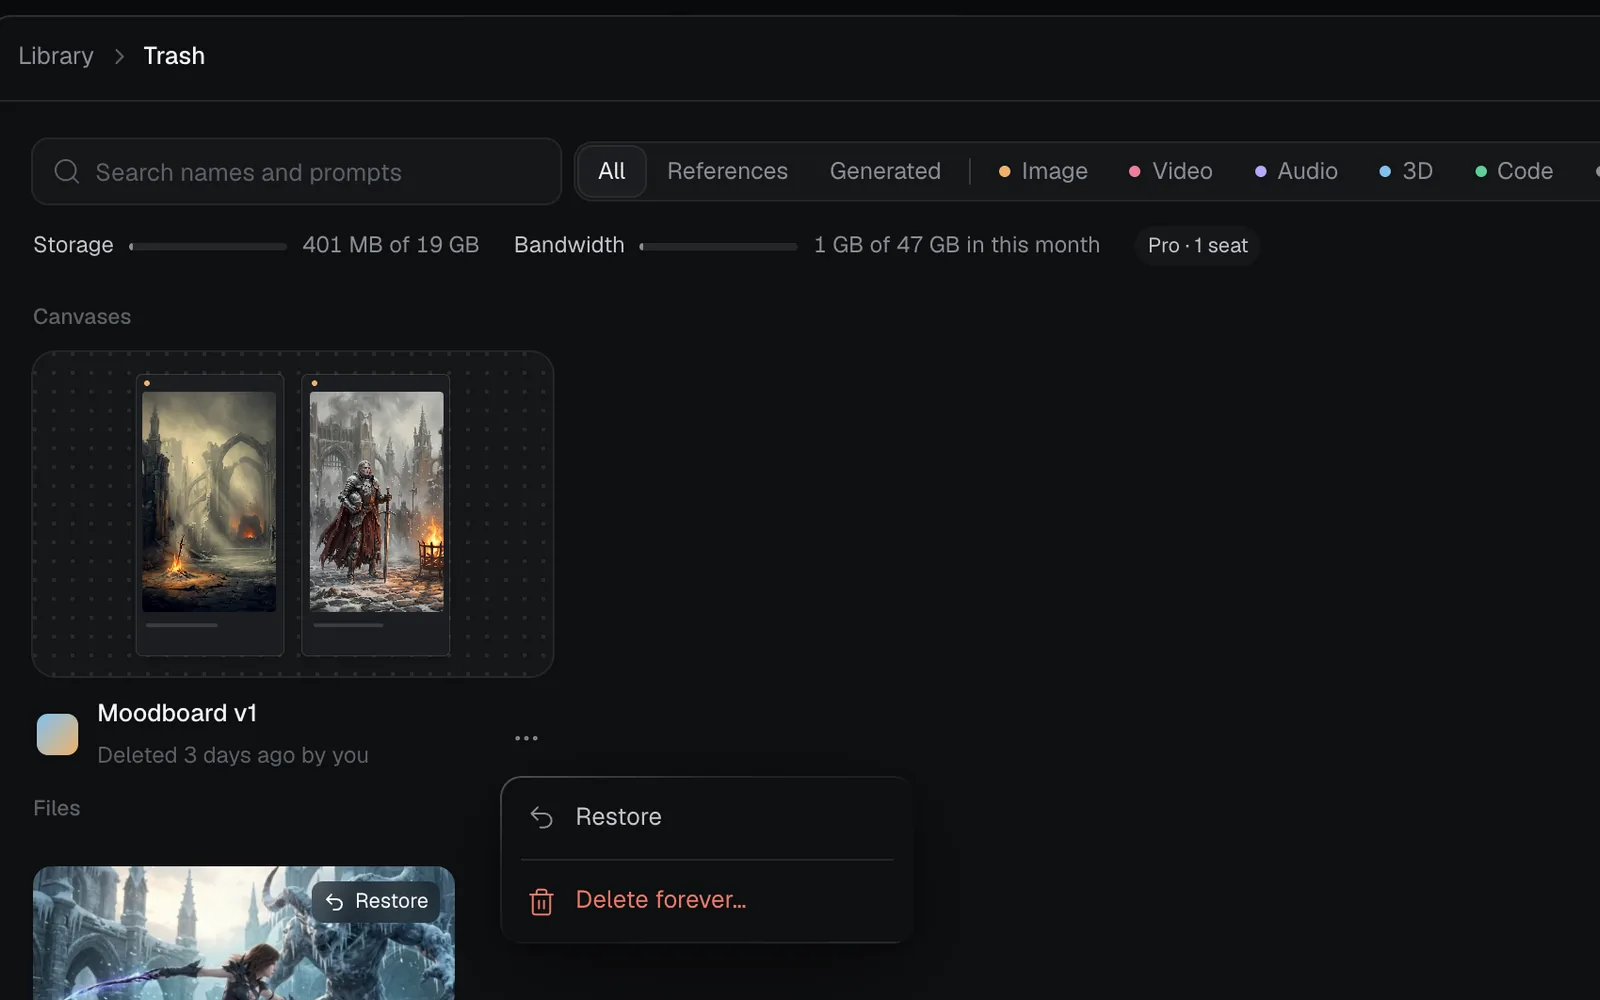
- Click the canvas's card, or choose Restore in its ··· menu, to restore it.
- Delete forever… removes the canvas, with its nodes, links and comments, for everyone. It can't be undone; the files made on it stay in the Library.
- Only the canvas's maker and the workspace owner can delete it. A canvas in the Trash can be read but not changed.
On Free, a restored canvas counts toward the 3 again.
What's next
- Canvas basics: nodes, links, runs and moving around.
- Sharing and teams: invite people to a canvas to edit, view or comment.
- Files and the library: the files your canvases make, and the Library's projects.
- Keyboard shortcuts: every key for sections, notes and comments.