Canvas basics
Learn Fil's AI canvas. Add prompt, image, video, 3D, code and audio nodes, wire them together, run them, and move, zoom and arrange your work.
A canvas is an endless board where each prompt, file and model run is a node, and links carry one node's words or results into the next. A brief and a concept picture feed a key art image, the image becomes a clip, a 3D model or a page, and every take stays on the node that made it. This page covers making a canvas, the kinds of node, adding and wiring them, running them, and finding your way around.
Create a canvas
- Click New canvas on Home, or the pencil-and-square button at the top of the sidebar. The + beside Canvases in the sidebar, and New canvas in ⌘K, do the same.
- A canvas called Untitled canvas opens with an empty Prompt node, ready to type in.
- To rename it, click its name in the top bar, type a new one and press Enter.
A new canvas sits in your drafts; projects group canvases once you have a few. Workflows, chats and Open in canvas on a library file also start canvases for you.
Node types: prompt, image, video, 3D, code and audio
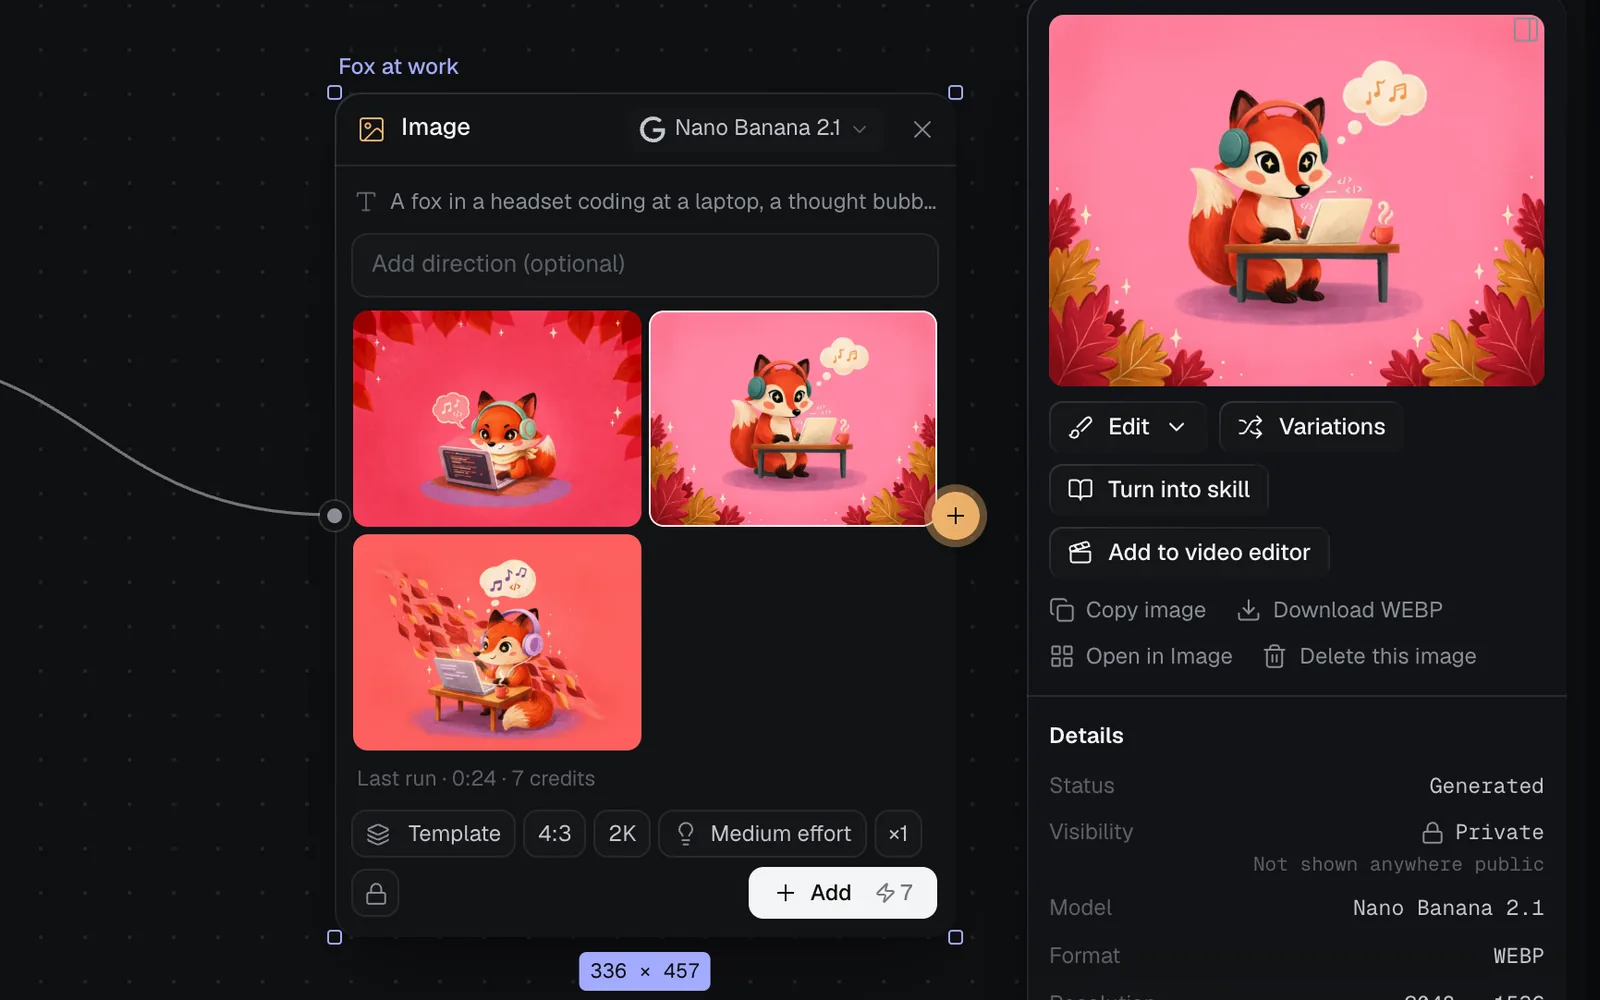
Every node has its name above it (double-click to rename it) and a header with its kind. Nodes that take inputs have a dot on their left edge. Nodes that can feed others have a dot on their right edge too, which turns into a + when you point at the node or select it. A generation node also has its model at the top right, chips for its settings along its foot, and Generate with the price.
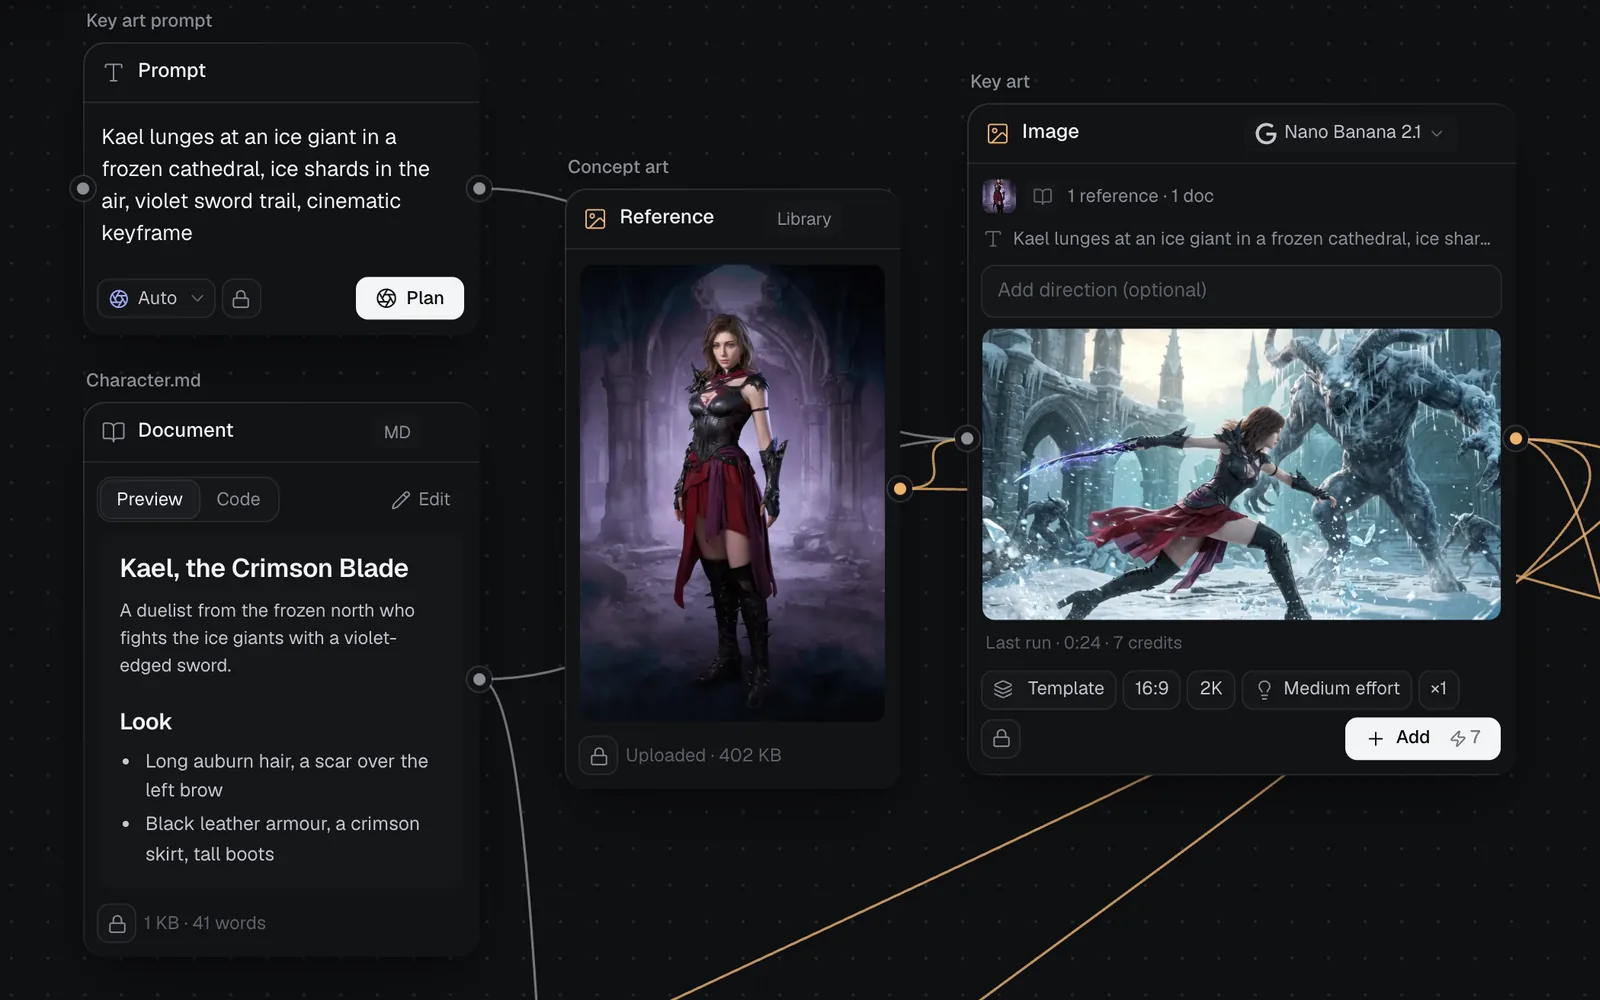
| Node | What it's for |
|---|---|
| Prompt | Words for whatever it feeds, or a request that Claude plans into nodes (Auto) |
| Document | Markdown, text, a PDF or a web page that the nodes it feeds read as notes |
| Skill | A SKILL.md: instructions a node follows when it runs |
| Reference | A file from your library: a picture, clip, sound or 3D model |
| Image | Pictures from a prompt, references or both |
| Video | Clips, often from a picture as the start frame |
| 3D | Textured models from a picture or a prompt, rigged and animated if you like |
| Code | Websites, pages, slides, SVGs, social posts and more. Its header says what it makes: Website, HTML, React… |
| Audio | Voiceovers, sound effects and music |
| Video edit | Videos, pictures and sounds cut into one video in the video editor |
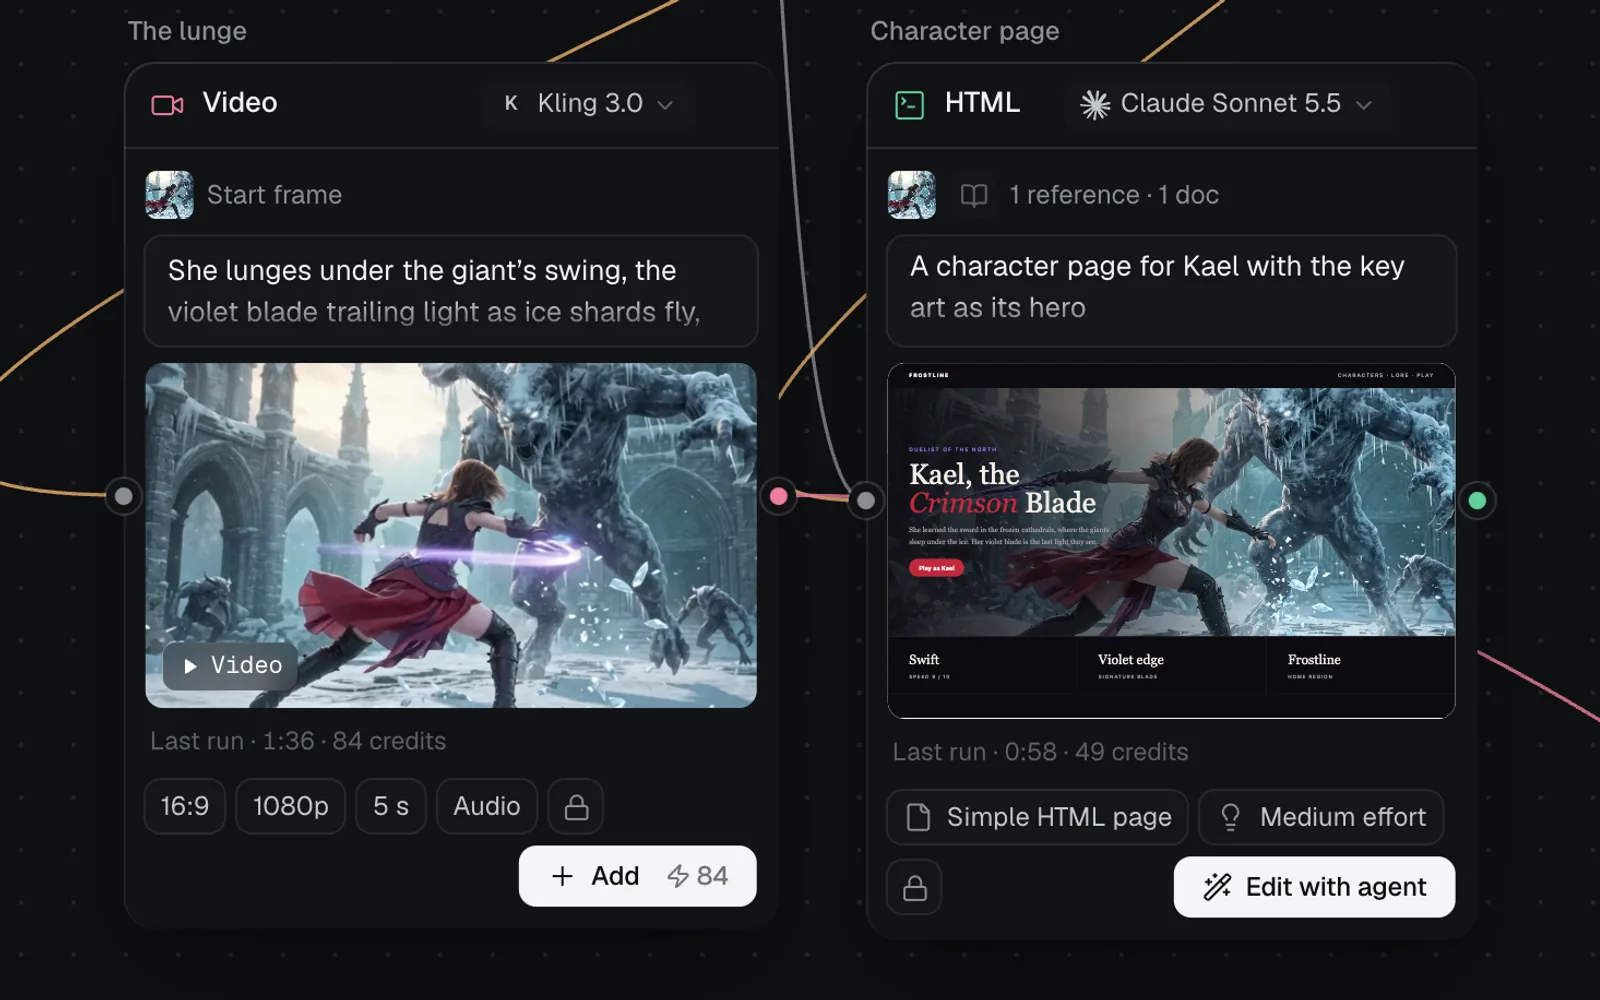
A Code node that makes a website turns into linked parts, its pages, design system and data, each a node of its own (see Build a website). Sections, notes and comments help you arrange a busy board: see Organize a canvas.
Add a node to a canvas
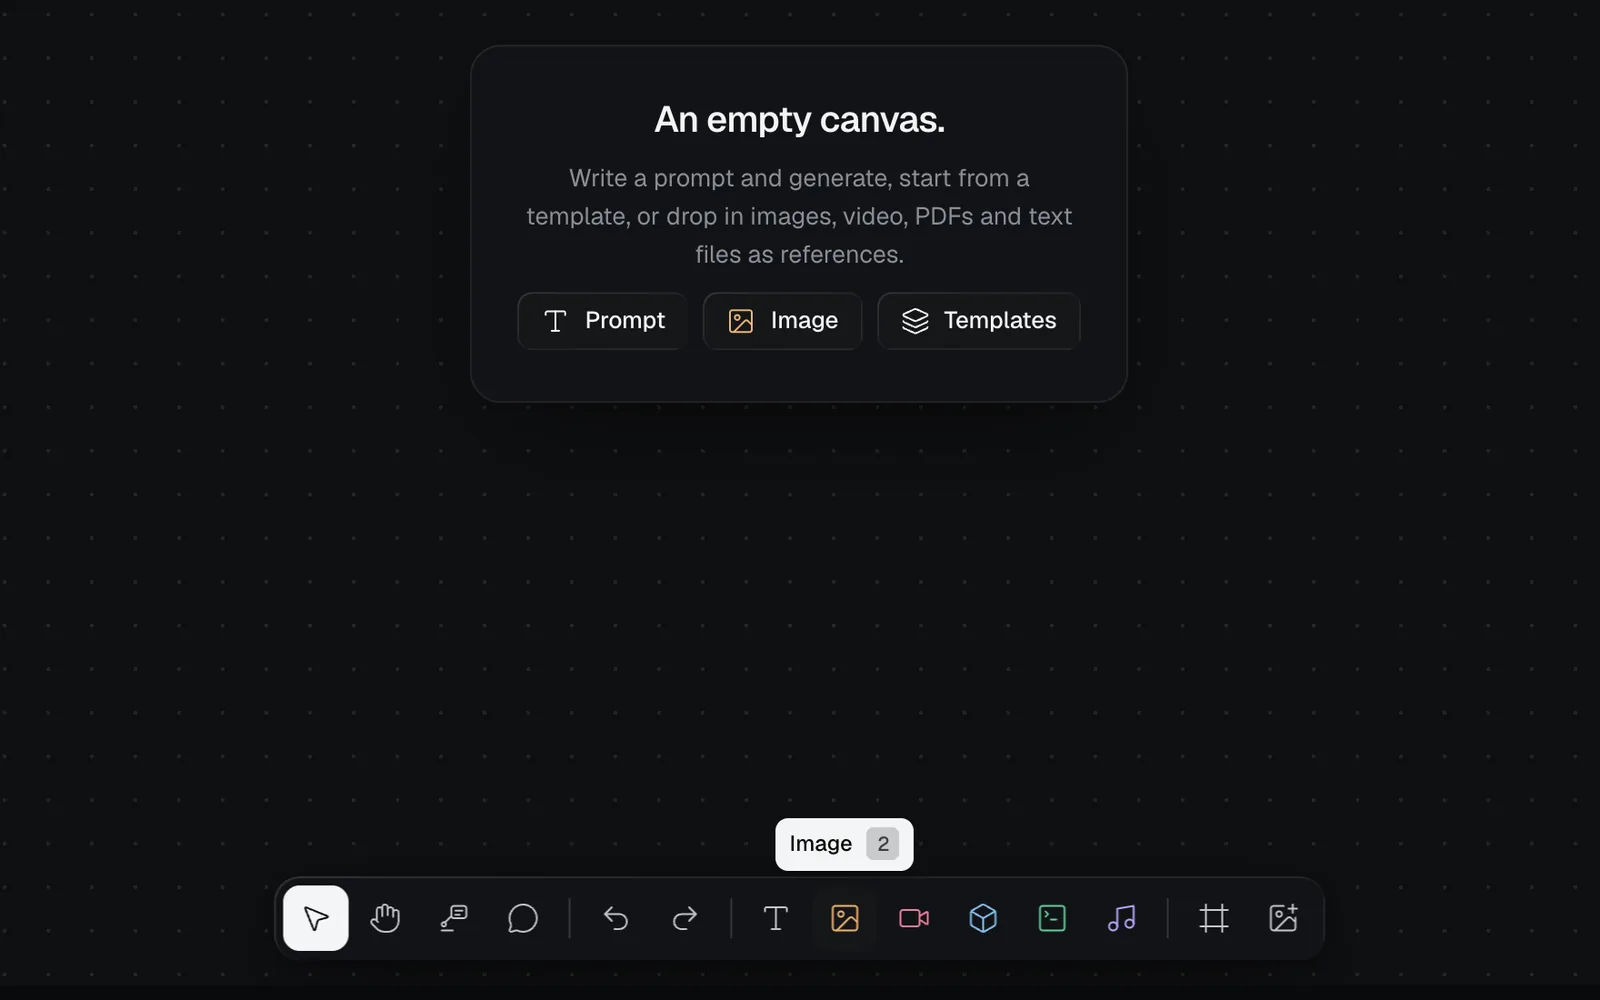
- The toolbar at the bottom: Prompt, Image, Video, 3D, Code and Audio add a node in the middle of the view. Hover a button for its key: 1 to 6. An empty canvas also has Prompt, Image and Templates in its middle.
- Right-click an empty spot for the Canvas menu: Add prompt, Add image, Add video, Add 3D, Add code and Add audio put the node where you clicked. The same menu has Upload files, Add design system… and Add site data….
- Double-click an empty spot to add a Prompt there, ready to type.
- Click a node's + to add the next node beside it, already wired: a Prompt makes the kind it's set to (an Image node on Auto), and a picture, clip or page makes another of the same kind.
- Drop or paste files, pictures, text or a link onto the canvas: they arrive as Reference and Document nodes, and plain text you paste becomes a Prompt (see Files and the library).
The rest of the toolbar holds the Move and Hand tools, Annotate and Comment, Undo and Redo, Section (notes, comments and sections are in Organize a canvas), and upload. Keys work outside a text field: T adds a Prompt and I an Image node too. With one node selected, a node added from the toolbar or a key goes to its right, wired to it, when it can take what that node makes. New nodes start on the model and settings you last used for their kind.
Connect nodes
A link carries a node's words or result into another node. Wire as many inputs into a node as its model takes.
- Point at the node you want to feed from, press on the + at its right edge, and drag.
- Let go on the node it should feed. The canvas says "Connected Key art prompt to Image 1".
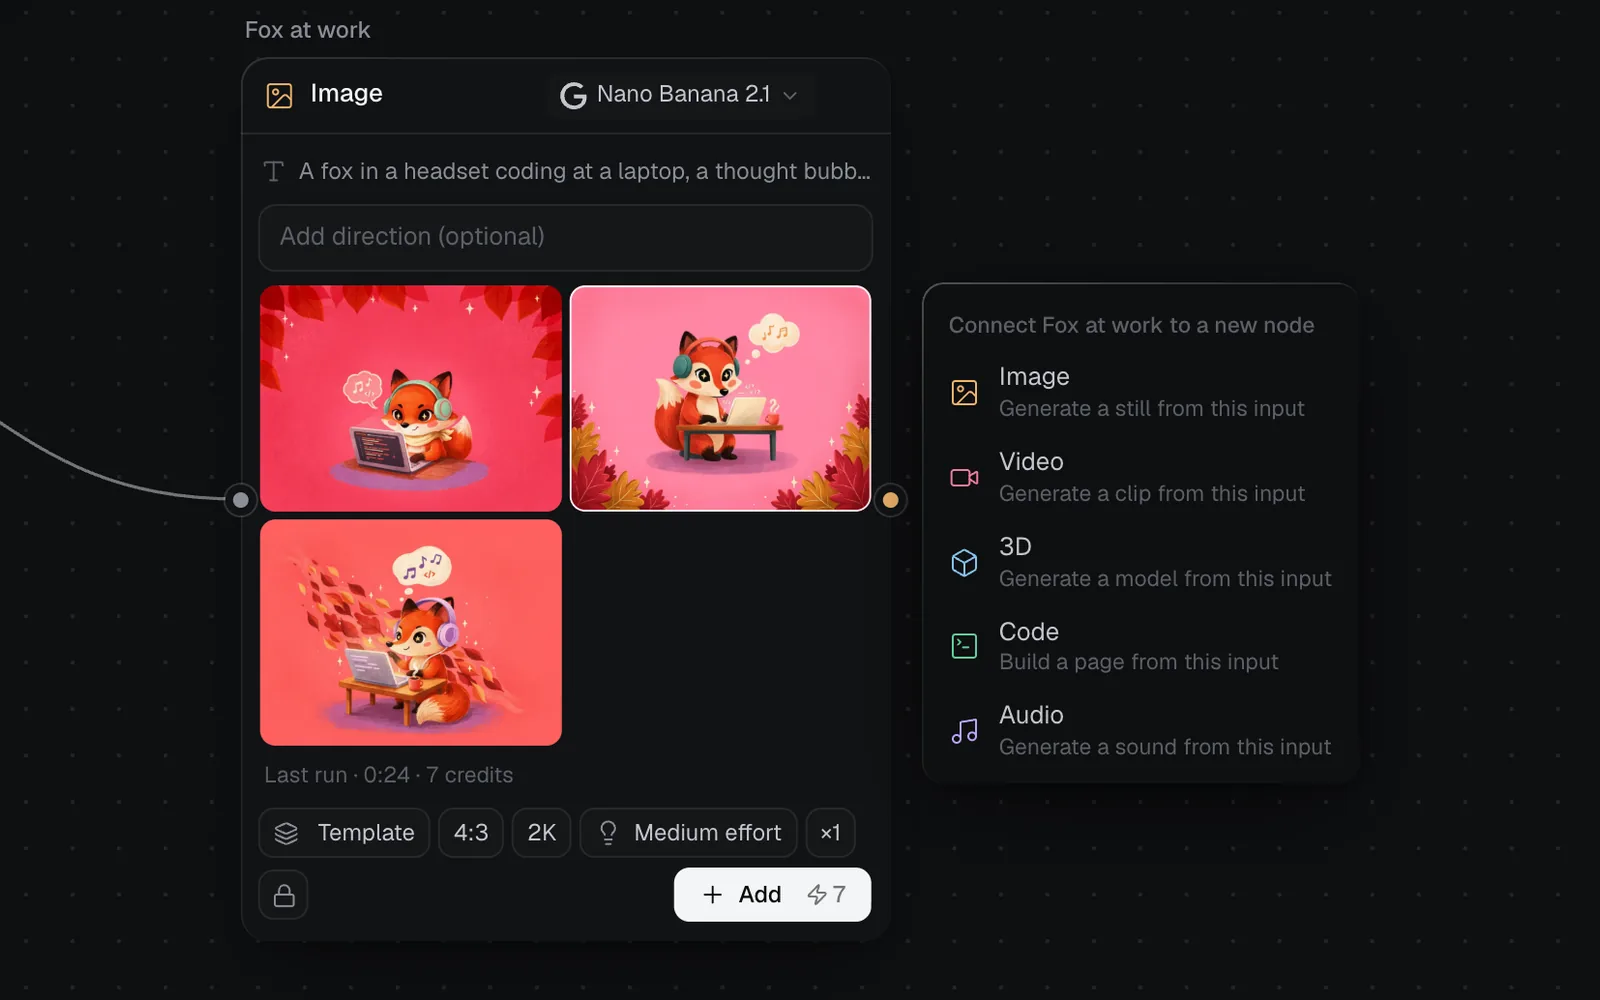
- Or let go on an empty spot: a menu headed Connect … to a new node offers only the kinds it can feed. Pick one, and the new node arrives there, wired.
What an input does depends on what it is:
- A prompt's text becomes part of the prompt.
- A document's text is added as reference notes.
- A picture, clip or model is used as a reference: a start frame for a video, a source for a 3D model, a look for a page.
An Image node fed a picture follows that picture's shape (Match reference in its aspect ratio menu) until you pick a ratio. Pages feed only Code nodes, 3D models feed only 3D nodes, and a link that would make a loop is refused. To remove a link, click it and press ⌫, or right-click it and choose Delete link.
Run a node and keep every take
- Check the model at the top of the node and the chips along its foot. The price shows on Generate.
- Click Generate on the node, or select it and press Enter.
- On a node's first run, Claude Sonnet 5.5 reads the run first. Usually it starts at once; if a change would help, a Review card offers options with their prices, with Generate as is and Apply and generate.
- The node shows Generating with a timer, and the panel on the right opens with the run's details. Runs keep going if you leave the canvas or close the tab.
- The result lands in the node, with Last run and what it cost under it.
A node's button reads Plan instead when Claude will suggest takes first: when its only inputs are references, or it follows an image template (see Canvas templates). Nothing is spent until you pick one.
A Prompt has its own button. Set to a kind (Image, Video…), it reads Generate and runs the idle node of that kind it feeds, or adds one. On Auto, the default, it reads Plan: Claude plans new nodes from it instead (see Chat and plans).
After the first run the button reads Add: each run adds its results to the node, as it is, without a review. A finished page's button reads Edit with agent instead, which opens it in the Design tab to change it. A node shows up to 8 results ("Showing 8 of N · all in the panel") and keeps its last 24 runs. Click a result to pick it: the picked one is outlined, shows in the panel and is what the node feeds on. With a result picked in a node that has several, ⌫ moves that result, not the node, to the Trash, with Undo in the message.
To run several nodes, select them and press Enter: the canvas asks first, with what they cost together.
The inspector panel
The panel on the right is the inspector. It opens by itself when a run starts or when you select a node with results; otherwise click Show properties at the top right. ⌘\ shows or hides both side panels.
| Selected | The panel shows |
|---|---|
| A generation node | Its picked result large, its tools (such as Edit, Variations, Inspire from, Turn into skill, Add to video editor, or Design for a page), download and copy links, Delete this image, Details (status, model, size, time, cost, runs), its inputs and a Note |
| A Prompt or document | Its text, its references, what it feeds, and a Note |
| Several nodes | How many of each, Generate from selection, Align, and Run selected nodes |
| A link | Which node feeds which, and what flows along it |
| Nothing | The canvas's look, its notes, its comments and its shortcuts |
Visibility in Details says whether what a node makes can be shared in Community. On Free, everything is public. On Starter, Pro and Max new nodes start private (the lock), and a run from a private input stays private; click the lock or globe to switch.
Select, move and resize nodes
- Click a node to select it; ⇧-click adds or removes one. Drag across empty canvas to select every node the box touches, and ⌘A selects them all. Esc clears the selection.
- Drag a node by its header or body to move it, and dragging one of several selected moves them all. Nodes snap to their neighbours' edges and to a 24 px grid; hold ⌥ while dragging to place freely. The arrow keys nudge the selection 1 px, or 10 px with ⇧.
- With one node selected, drag its right edge to make it wider or narrower (up to 560 px). Its size shows under it.
- Double-click a node's name to rename it (up to 60 characters).
- ⌘D duplicates the selection, links between the copies included. There's no copy and paste of nodes: ⌘V pastes files, pictures, links and text from your clipboard as new nodes.
- ⌫ with nodes selected, or the × in a node's header, deletes them with their links. ⌘Z undoes it, up to 100 steps while you're on the canvas.
Zoom, pan and use the minimap
- Scroll or swipe with two fingers to pan; pinch, or hold ⌘ and scroll, to zoom at the pointer. Hold Space and drag, or use the Hand tool (H), to pan with the mouse.
- F or ⇧1 zooms to fit, ⇧2 zooms to the selection, ⇧0 goes to 100%, and ⌘+ and ⌘− zoom in and out. The canvas goes from 20% to 300%.
- The percentage at the bottom left opens the zoom menu: Zoom in, Zoom out, Zoom to fit, Zoom to selection, 50%, 100% and 200%.
- The minimap above it draws the whole board, with the view as a rectangle: click or drag in it to go somewhere. The map button beside the zoom hides or shows it, and the canvas remembers that in this browser.
On a big board, Zoom to fit stops at 80% and shows the top left; zoom out further, or use the minimap, to see everything. In a narrow window the minimap hides and the zoom moves into the toolbar.
Open a result full size
Double-click a result in a node, or click the expand button at its corner (View full size). The full view shows the file large, with its prompt, model, format, size and its place among the canvas's files at the top.
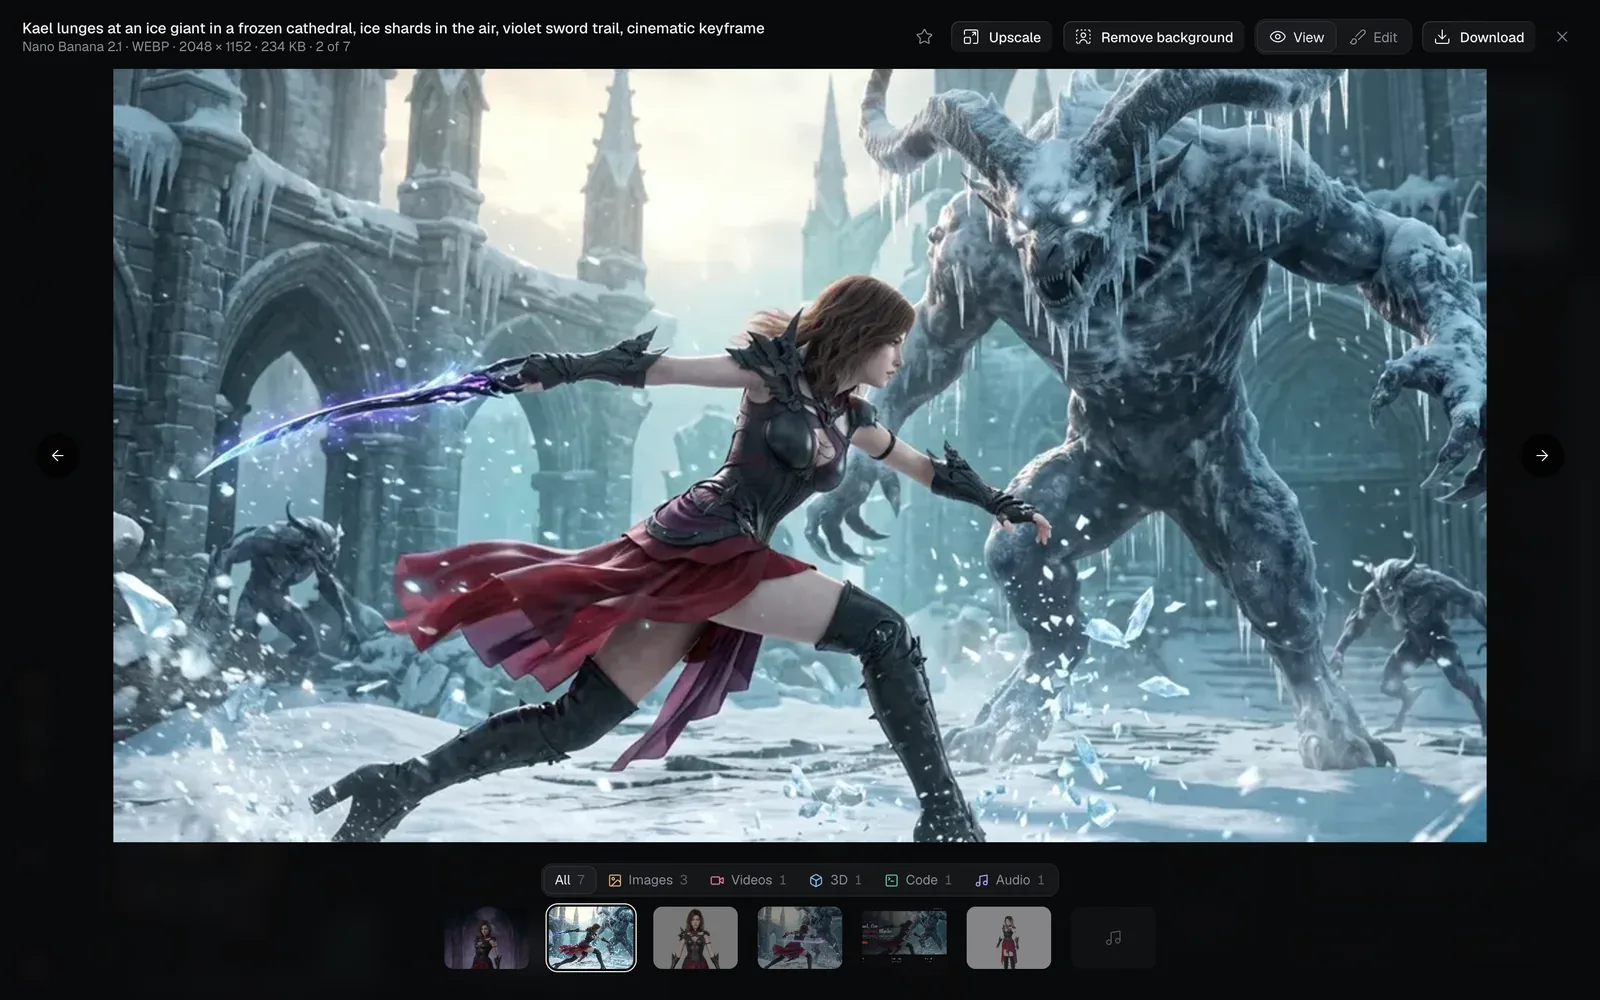
- ← and → step through every file on the canvas, not only that node's. The filters above the strip jump to images, videos, 3D models, code or audio.
- Edit opens the image tools (see Image editing), and Design opens a page in the Design tab.
- Upscale and Remove background close the view and add an Upscale or Cutout node, fed by the picture, that waits for you to press Generate.
- A page, an SVG or a text file a Code node wrote keeps its earlier versions: the button at the top that reads, say, "3 versions" lists them, and Restore brings one back as a new version.
- Download saves the original file. Esc closes the view.
Canvas menus and the left panel
Click Show layers at the top left (or the canvas's name beside it) to open the left panel, with its tabs: Chat, Layers, Assets (upload, or drag in a library file) and Templates (see Canvas templates).
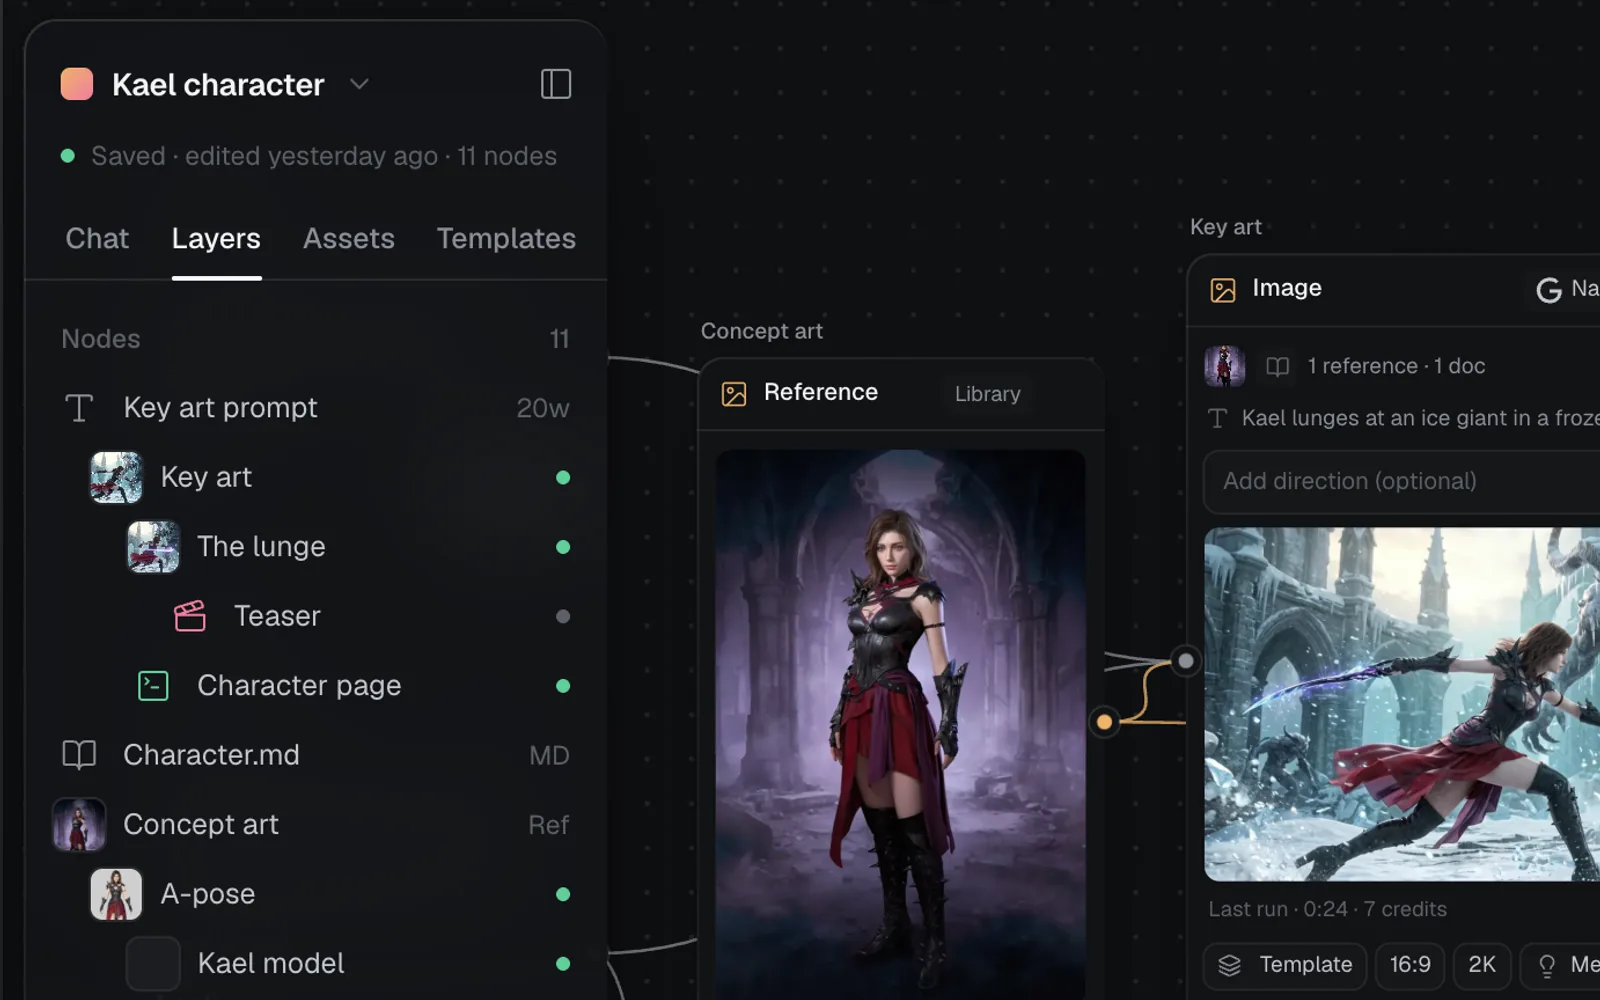
Layers lists every node, the ones it feeds indented under it, each with a word count, Ref, its file type or a dot for done, failed or idle. Click a row to select the node and bring it into view. The canvas's name at the top of the panel opens the canvas menu.
- The canvas menu: New canvas, Duplicate canvas, Share, Delete canvas… (for the canvas's maker and the workspace owner), then every canvas in the workspace to jump to.
- Right-click a node for Generate, Duplicate, Copy prompt, Rename, Bring to front, Set as thumbnail, Zoom to selection, Make public or Make private, and Delete, plus Add to video editor for pictures, clips and sounds.
- Right-click empty canvas for the Canvas menu above, a link for Delete link, and a section's title for its own menu.
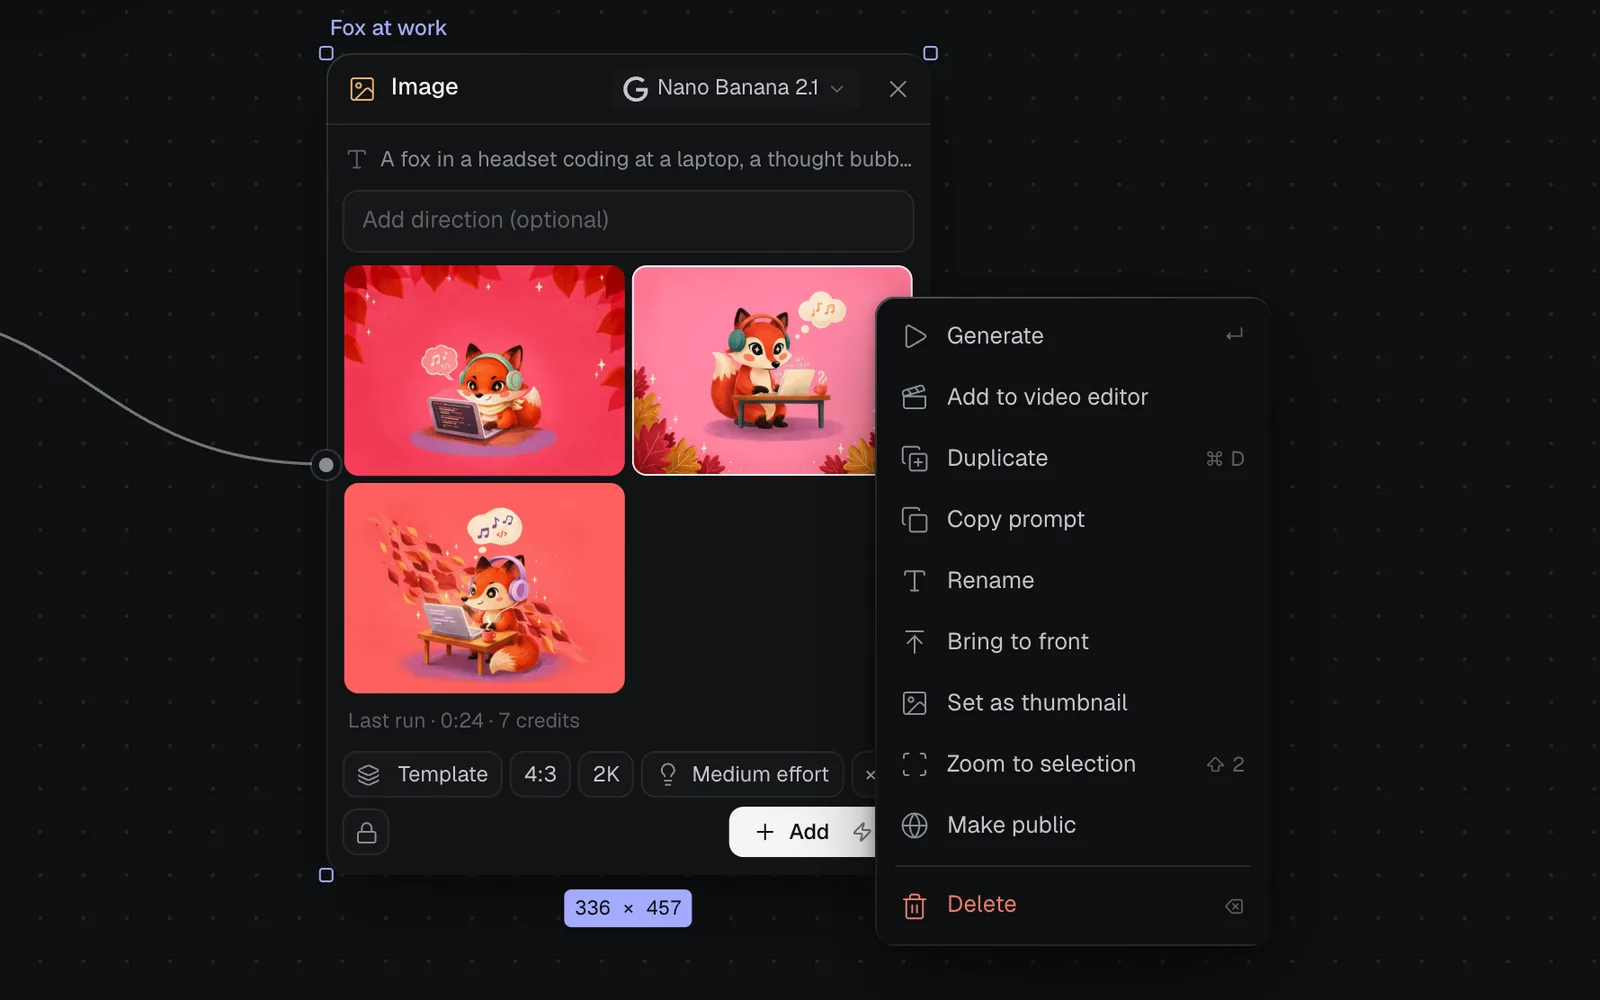
Set as thumbnail makes that node's result the canvas's card on Home. Every menu on a canvas is listed in The sidebar and menus.
Canvas shortcuts
Keys work outside a text field, and the studio's one-letter keys that open views elsewhere do canvas things here; ⌘K still opens the command menu. The keys are given above where they're used. The full list, with sections, notes and comments, is in Keyboard shortcuts.
Tips and limits
- A prompt can be up to 2,000 characters.
- Someone you share a canvas with as a viewer can look, move around and comment, but not change anything: "Viewers can’t edit this canvas." See Sharing and teams.
- On a phone the panel on the right becomes a sheet at the bottom, and the minimap hides.
- Everything a node makes is also in your Library, and stays there if you delete the node.
What's next
- Prompts, documents and skills: briefs, notes and skills that feed your nodes.
- Organize a canvas: sections, notes, comments and projects.
- Canvas templates: prompts already wired to the right node.
- Image generation and Video generation: every model and setting.